When your laundry comes out of the washer with lint or is not clean enough, chances are the washer needs cleaning.
There are many ways you can clean the drum of the washer, depending on whether it’s a top-load washer or a front-load washer.
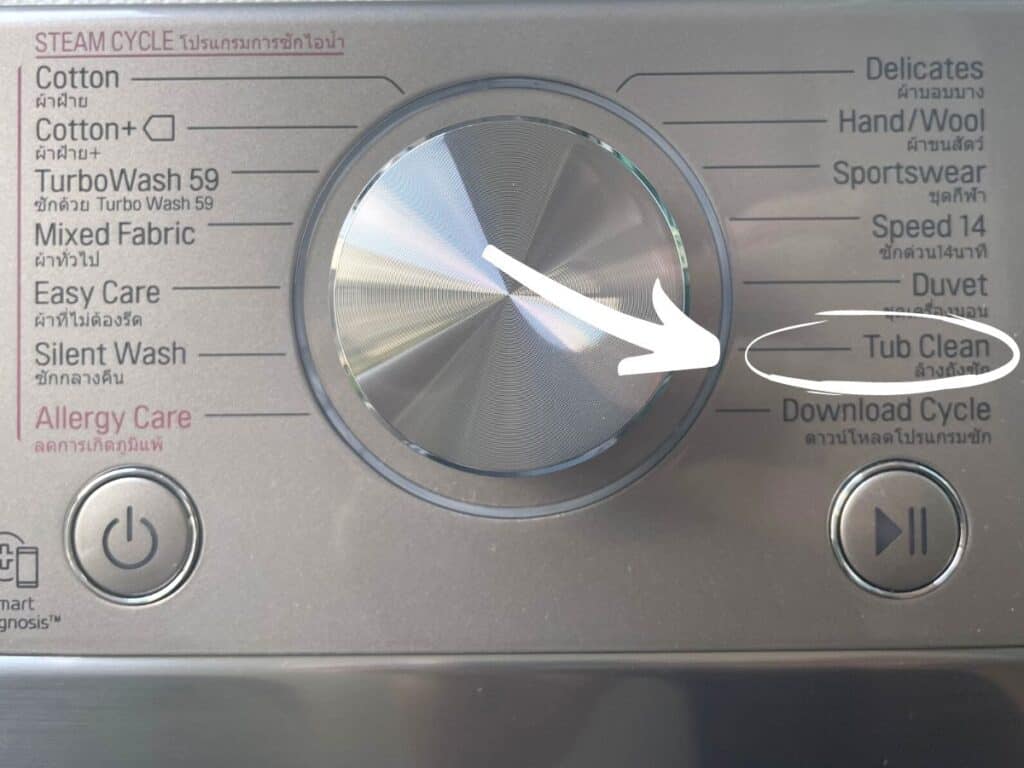
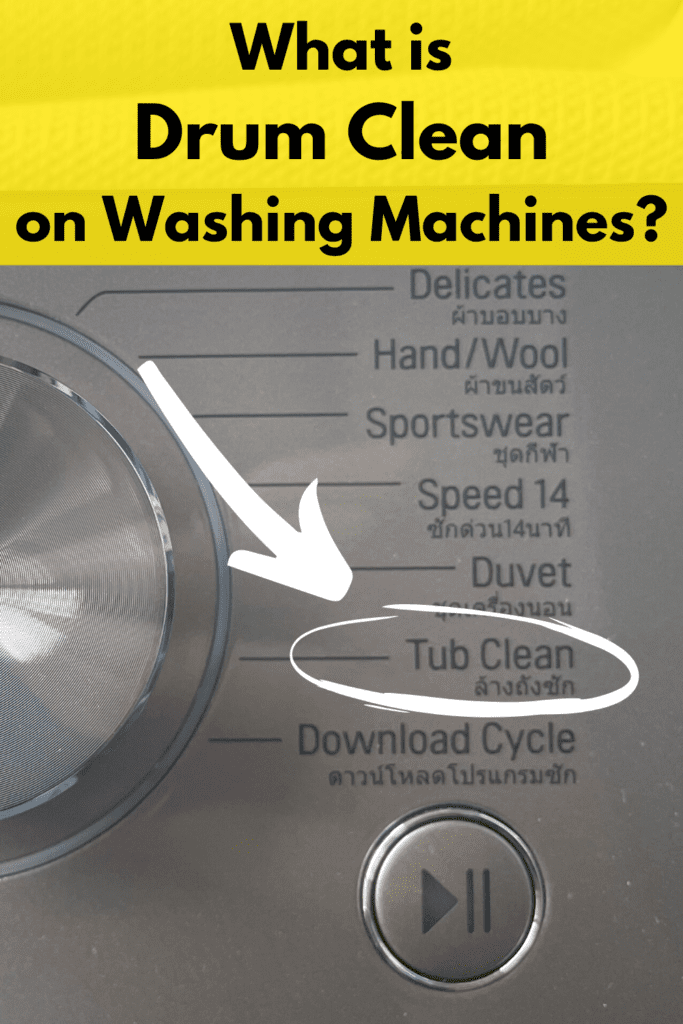
Many washers have simplified the task of cleaning the drum by including a drum clean setting on the panel. This setting allows you to clean the drum thoroughly with a push of one button.
- But how would you use the drum clean setting?
- And does the washer have to be empty when you run this special cycle?
- And what if the washer doesn’t have this setting, how would you clean the drum?
Read more to find full and comprehensive answers to all of these questions.
What is the Drum Clean Setting?

The drum clean setting is a special program in the washer that not only cleans the drum but the door gasket as well.
Over time and with regular use, the drum becomes infested with bacteria, grime, lint, and chemical buildup from the detergents and fabric softeners you pour into the washer.
You can think of the drum clean setting as a one-stop solution that takes away the hassle of cleaning the drum and door gasket yourself.
When you select the drum clean setting, the washer will automatically heat up the water to about 70 degrees Fahrenheit.
This temperature is enough to kill all the bacteria and pathogens lurking inside the drum and rubber of the door gasket.
You don’t have to add anything to get the drum cleaned up. But adding bleach, baking soda, or white vinegar won’t hurt.
In fact, those materials can improve the cleaning and sterilization of the internal parts of the washer.
Especially when you have limescale buildup that won’t just go away with hot water and excessive agitation alone.
That said, what you wouldn’t want to add to the washer is laundry. The drum clean setting requires that the washer would run empty for a whole cycle.
But what if your washer doesn’t have a drum clean setting?
Or what if you’re not happy with the results of using that special setting and want to give the drum a thorough cleaning the old-fashioned way?
The answer is below.
How to Clean the Drum of a Top Load Washer
Although a washer drum is the same in all washer brands, the machinations of cleaning the drum vary depending on whether it’s a top loading washer or a front loading one.
So let’s get right into the top load washer first.
Materials
- Bucket
- Small bowl
- Microfiber cloth
- Chlorine bleach
- Measuring cup
- Dishwashing liquid
- Distilled white vinegar
- Small saucepan
- An old toothbrush or a scrub brush
Then follow these steps
1. Empty the Drum
Open the top lid of the washer and check that the drum is empty. If there are any clothes there, remove them.
Also, check the soap drawer for any traces of detergent or fabric softener that might be at the bottom of the drawer. Wipe these liquids off with a clean washcloth.
2. Set the Water Temperature
Most washers with a drum clean setting will heat the water to 60 or 70 degrees F. However, since you’ve taken matters into your hands, then you can go ahead and set it to the highest temperature.
Whether the drum is made of stainless steel or aluminum, it can tolerate high water temperatures.
What maximum temperature does is loosen the gunk, limescale buildup, and stuck debris in the nooks and crannies of the drum.
It also kills any bacteria and parasites lurking in that gunk without the help of any detergents or cleaning agents.
3. Choose the Cycle
If you’re familiar with the different programs on the washer, then choose the longest cycle.
But if you’re in doubt, go with the heavy-duty cycle. This is usually the one that takes the longest time to finish.
You’d want the washer to take anything from 90 minutes to 150 minutes agitating the hot water inside of the drum. The longer the hot water swirls in there, the cleaner the drum.
4. Start the Washer
When you click the Start button, the washer will begin to heat the water and fill the drum. Wait for this to happen but don’t leave the washer just yet.
Once the drum is full of hot water, press the Pause button to stop the washer before it begins to agitate.
5. Add the Cleaning Agent
Lift up the lid of the washer and add the cleaning agent of your choice. You can use baking soda, white vinegar, or chlorine bleach.
I recommend chlorine bleach for this first cycle for its ability to break down limescale and other gunk quickly and more efficiently.
Pour 4 cups of chlorine bleach directly into the hot water in the drum. You won’t need to mix them because the water will agitate the washer anyway.
Close the lid and press the Start/Pause button to continue the cycle.
Try to use only one cleaning agent at a time. Don’t mix chlorine bleach with other liquids such as white vinegar.
This would release chlorine gas into the air, which is quite toxic.
6. Run the Cycle
Now you can leave the washer to finish the whole cycle. It’s important that the drum goes through the three main stages of washing, rinsing, and spinning.
The debris and chemical buildup will have little chance of sticking to the drum by the end of that long cycle.
7. Start Another Long Cycle
When the washer is done, repeat steps 2 and 3 again. The maximum water temperature and the longest running cycle.
Once the drum is full, press the Pause button.
8. Add White Vinegar
Lift the lid and add 4 cups of white vinegar into the hot water. Close the lid and continue the cycle until the end.
9. Clean the Door
By the end of the second cycle, the drum will be squeaky clean.
Now you can clean the rubber door gasket with dish soap or a laundry detergent diluted in warm water.
Use the toothbrush or scrub to reach the inside of the rubber and remove all traces of dirt and gunk.
You can read more about washing machine care here.
How to Clean the Drum of a Front Load Washer

A front load washer is a little tricky to clean the drum and door. It’s not as accessible as the top load washer. Moreover, the door gasket tends to get as much gunk and bacteria buildup as the drum itself.
With that in mind, let’s see how you can clean the drum and door of a front load washer.
Materials
- Distilled white vinegar
- Sponge
- Dishwashing liquid
- Small bowl
- Baking soda
- Microfiber cloth
- Small saucepan
- Bucket
- An old toothbrush or a scrub brush
- Measuring cup
Now follow these steps
1. Clean the Rubber Door Gasket
We will start with the door of the washer for apparent reasons. There’s no point in washing the drum if the door is full of bacteria and gunk.
So open the door and fill the saucepan with two tablespoons of distilled white vinegar and warm water. Mix well, then dip the sponge in the liquid.
Clean the seal on the washer itself from the inside and outside. Make sure the vinegar-water mixture runs and coats over the seal on both sides.
Then turn your attention to the rubber door gasket. Apply the cleaning liquid liberally inside the rubber, then wash the inside of the door itself. If you encounter difficult gunk, use the toothbrush to scrub it off.
Wash the sponge under running water, then fill the bowl with lukewarm water and rinse the seal of the door and the rubber gasket thoroughly.
Repeat the rinsing until you can’t smell the vinegar on the door anymore.
2. Add the Vinegar
Measure two cups of distilled white vinegar and pour them at the bottom of the drum. For an extra gunky drum, use 2 ½ cups of vinegar instead of just two cups.
3. Add Baking Soda
Mix a quarter cup of baking soda in warm water in the bowl. Stir well, then pour the content into the soap drawer.
If you have a compartment for powder detergent, pour the quarter cup of powder baking soda into that compartment.
4. Set Water Temperature and Cycle
Now set the water temperature to the maximum level available. Choose the heavy-duty cycle to allow the drum to soak in the cleaning liquid for the longest time possible.
5. Start the Cycle
Press the Start button and let the washer chug through the cycle until it finishes. When baking soda and white vinegar mix, the chemical interaction is brief but quite effective.
It will kill the bacteria, loosen up limescale deposits and remove gunk from the drum.
You don’t have to be around the washer throughout the cycle. You can do something else in the meantime.
6. Wipe the Drum Dry
When the heavy-duty cycle finishes, open the door of the washer and use a clean washcloth to wipe the entire drum and the inside of the door dry.
Now your washer is clean and ready to take the next laundry load.
Tips to Keep The Drum Clean Longer
Although gunk, mold, bacterial buildup, and limescale deposits are correlated to the frequency of washing you do, other factors might come into play as well.
Here are a few tips to help you maintain the drum and keep it clean longer.
- Leave the door of the washer open after finishing the laundry. This will allow the drum and door seal to dry faster and prevent mildew and mold.
- Don’t use bleach or cleaning agents that might interact with the drum and cause rust or cracks. This is especially true of drums made of aluminum.
- Don’t keep the laundry detergents on top of the washer. They might leak and cause short circuits or damage the electronic parts of the washer.
FAQs
How Often should you do a Drum Clean?
If you do your laundry every 2-3 days, then you should clean the drum at least once a month. Not only will a clean drum prolong the life of the washer, but it will also prevent mold and bacteria from infiltrating the laundry, which could cause infections and skin diseases.
Is Drum Clean Necessary?
The drum clean setting itself is not a necessary feature of the washer. Experience shows that manual washing of the drum, as explained in this guide, can be more effective in removing gunk and chemical deposits than the automatic drum clean setting.
As for keeping the drum clean, that is a crucial part of the washer maintenance. It prevents malfunctions and the costly replacement of damaged parts due to limescale buildup and mold.
Do I Need to Put Anything in My Washing Machine for a Drum Clean?
The drum clean setting doesn’t require any detergents to run. In fact, adding any laundry detergents or stain removers is discouraged.
But if you’re cleaning the drum manually, then you can use bleach and white vinegar separately in two cycles for top load washers or baking soda and white vinegar in the same cycle for front load washers.
What Temperature is a Drum Clean?
Most washers with a drum clean setting will get the water temperature up to 60 or 70 degrees F. For the most part, that temperature is enough to kill germs and remove gunk. For manual drum cleaning, you can choose the highest temperature setting and longest cycle.
Conclusion
The drum clean setting is a convenient special cycle in many washers to clean the drum automatically. During the cycle, the water temperature can reach 60 or 70 degrees F to kill bacteria and break down chemical deposits and gunk.
If you don’t have the drum clean setting on your washer, you can clean the drum manually using bleach and white vinegar (separately) for top load washers and vinegar and baking soda combo for front load washers.
I’ve created a comprehensive guide on how to use all the settings on your washing machine that may interest you to read next.
I’m an expert wardrobe organizer and a bit of a clean freak. I created this website and its YouTube channel to share practical guides about laundry and organizing. My teachings have been featured in multiple large news publications, and I’ve self-published two wardrobe organizing books and an entire course on the subject.