After 10 years of testing out all possible ways to store t-shirts, I am finally ready to share the ultimate guide to folding, rolling, and hanging t-shirts with you. In this guide, I am going to teach you the fastest, neatest, most space-saving, and most wrinkle-resistant ways to fold t-shirts.
Just to cover all bases, I will teach you a special folding method for polo shirts, how to hang t-shirts, and how to roll the sleeves on them properly. I have added pictures of all the steps of the different folds, and videos for each folding technique in case you prefer to learn with video over images and text.
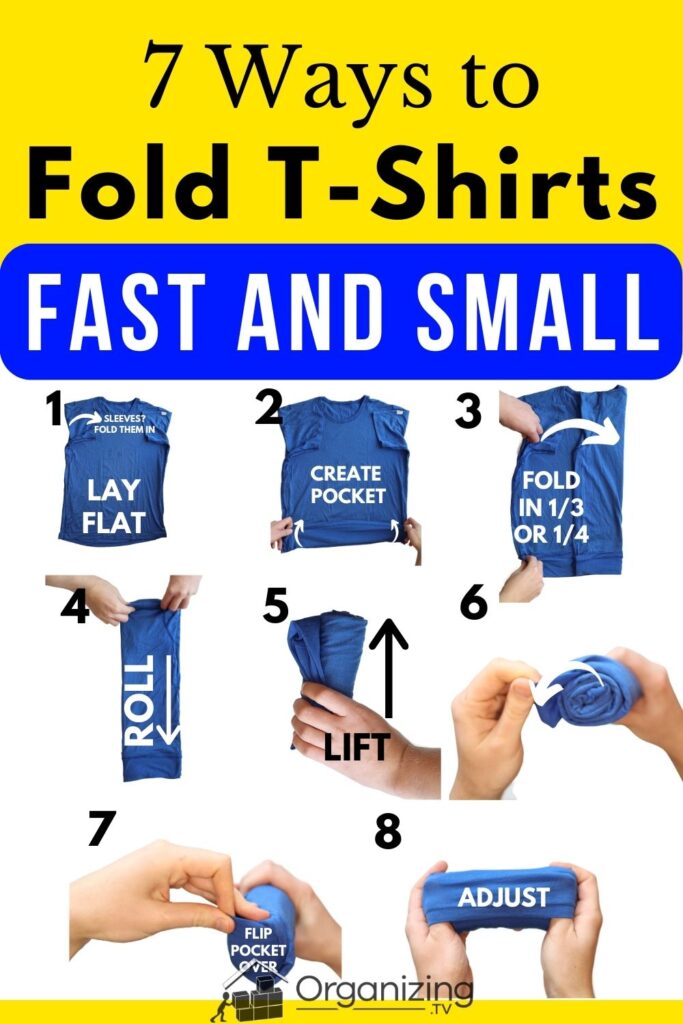
Pinch Fold Explained: Fold T-Shirts Fast

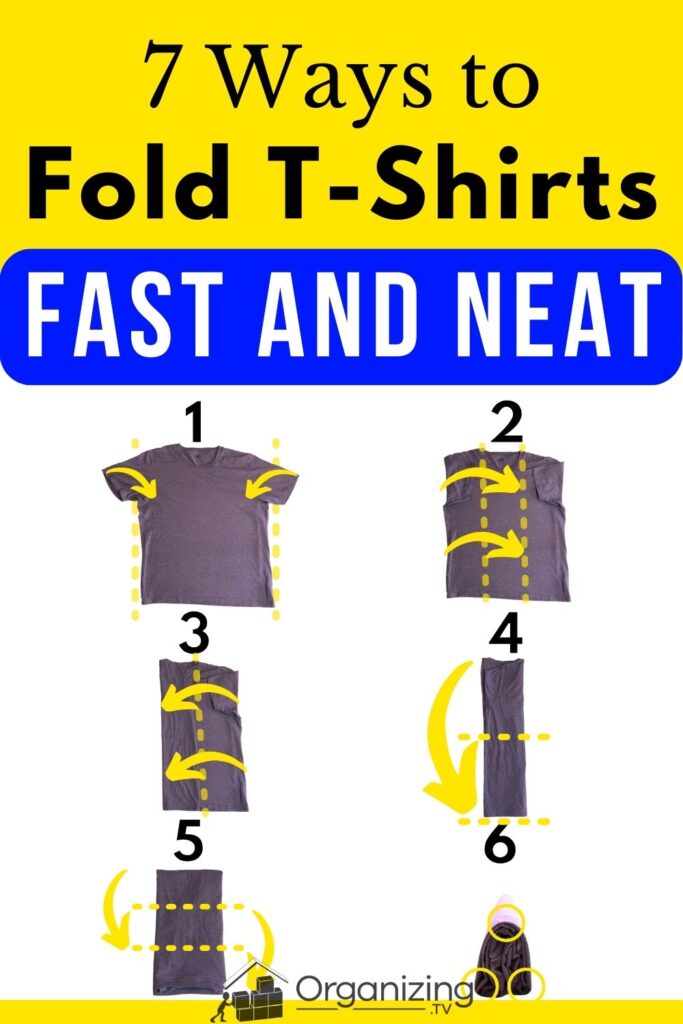
The pinch method is the fastest way possible to fold your t-shirts and polos. It is famously known as the 3-second fold or the 2-second fold, but to get up to this speed you need to practice. I have added a step-by-step explanation with images and a video so you can pick it up as fast as possible.
This is no exaggeration the fastest possible way to fold laundry by far.

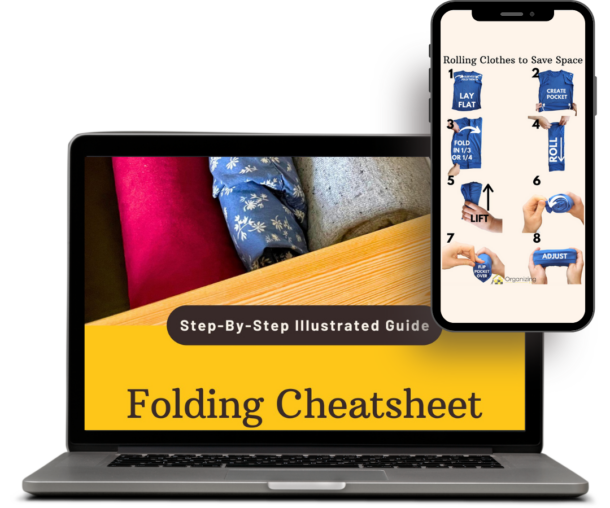
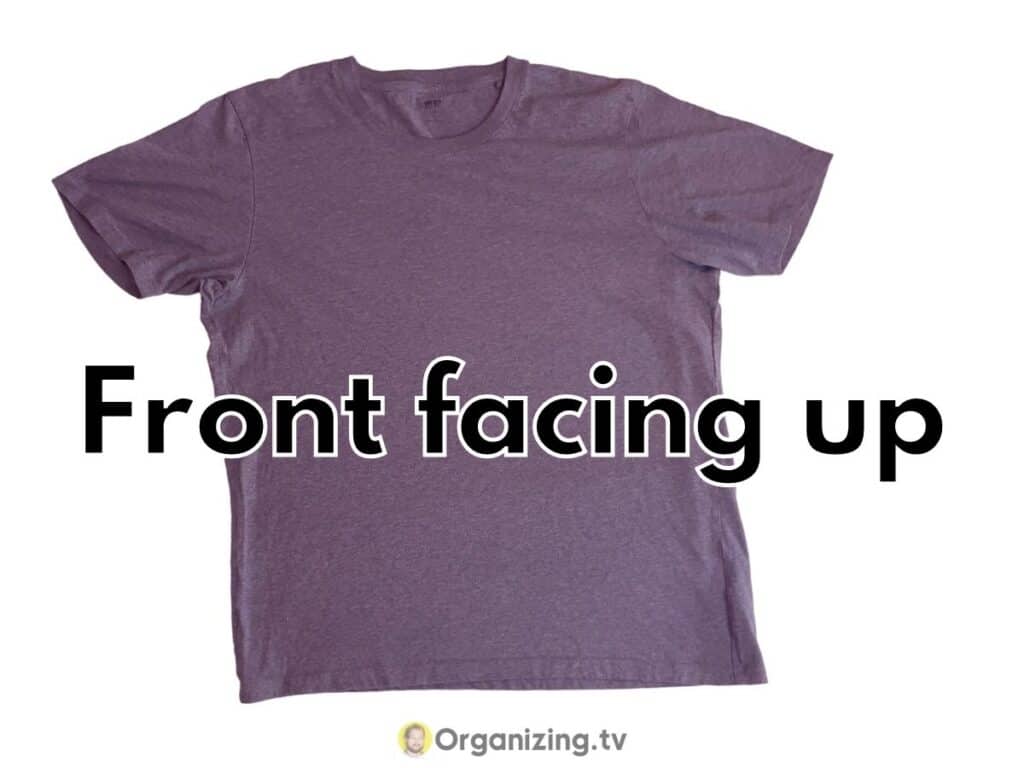
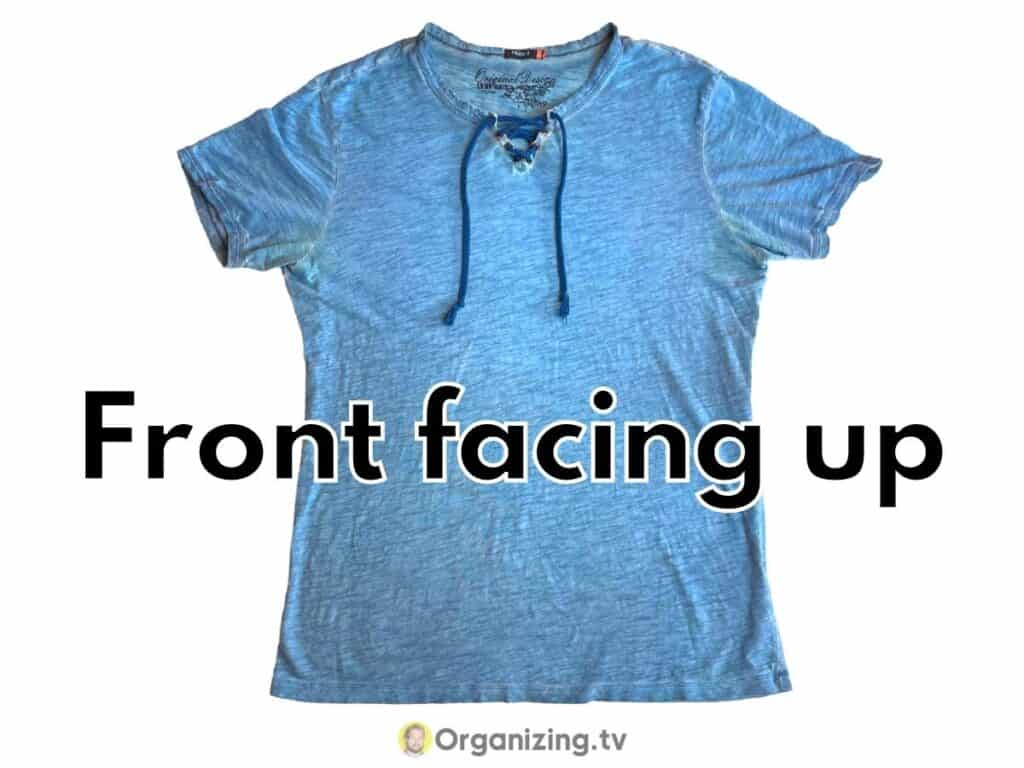
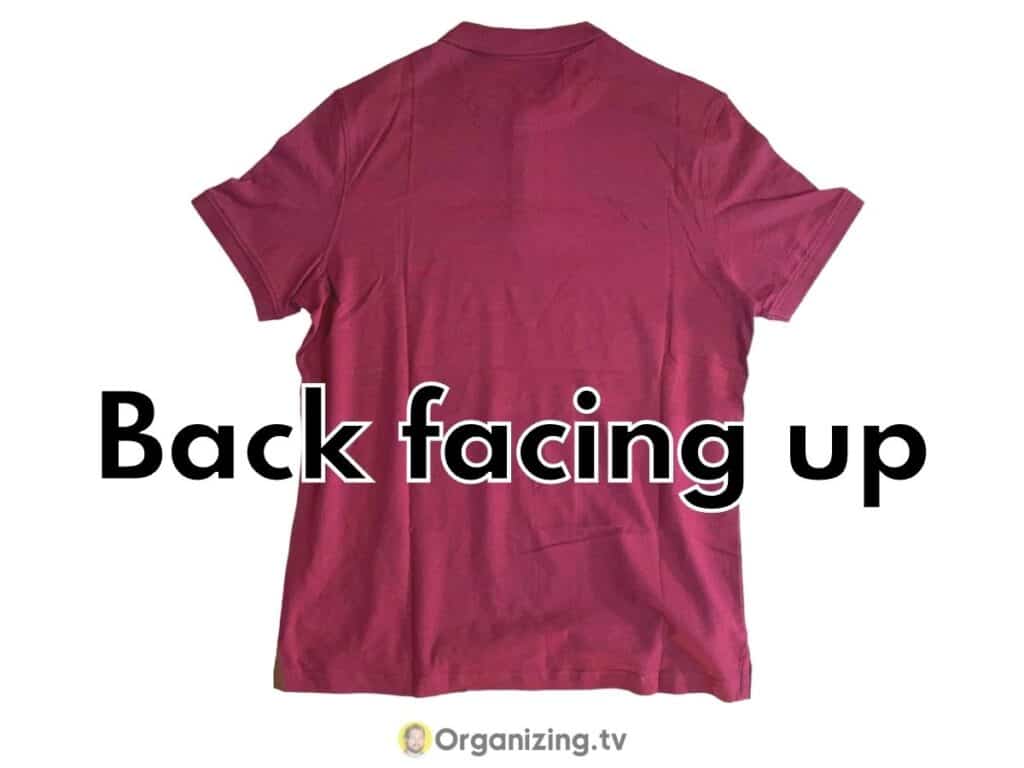
1. Place t-shirt on a flat surface with the front facing up
Find an area where you can easily lift the t-shirt up from. The surface should also be able to entire hold the t-shirt as we will be working with it throughout the entire fold.

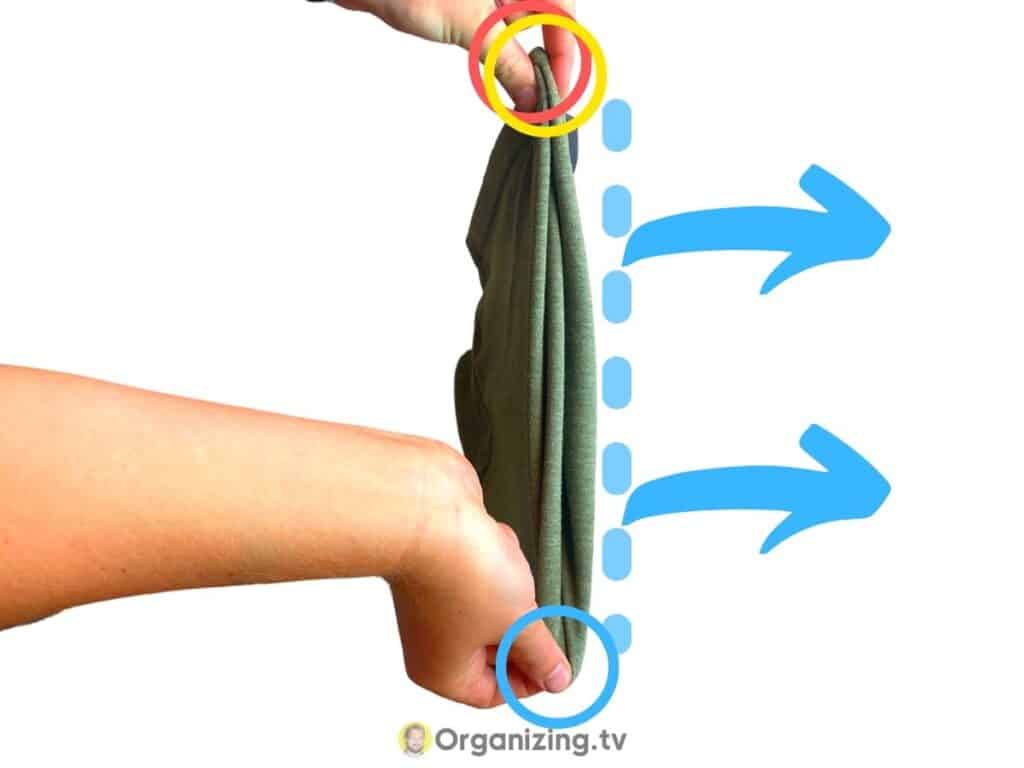
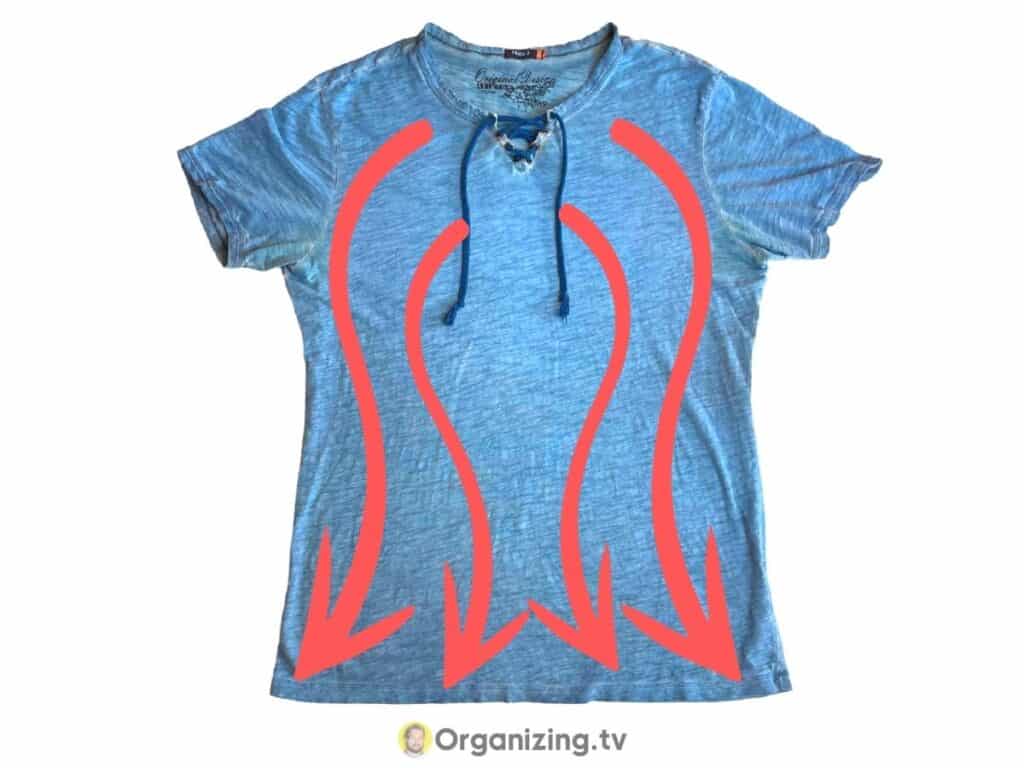
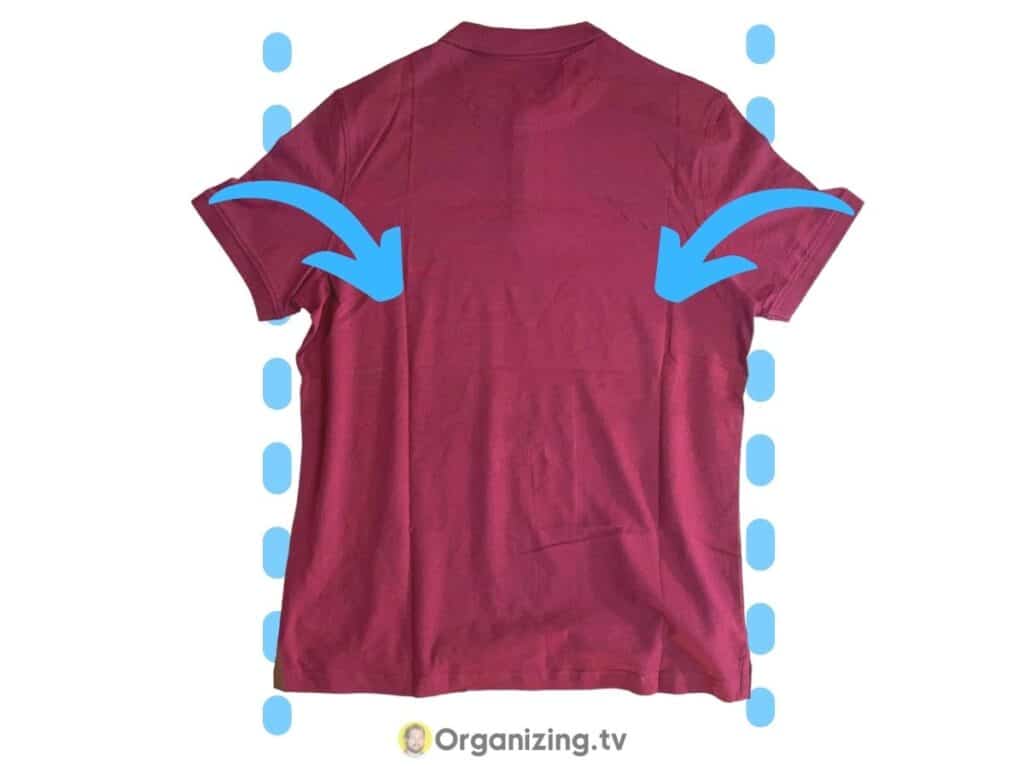
2. Pinch the areas between the shoulder and collar with one hand, and middle with the other
With your left hand, grab the top of the t-shirt between the collar and the seam of the left shoulder. With your right hand grab the middle of the t-shirt in the area parallel to your left hand.
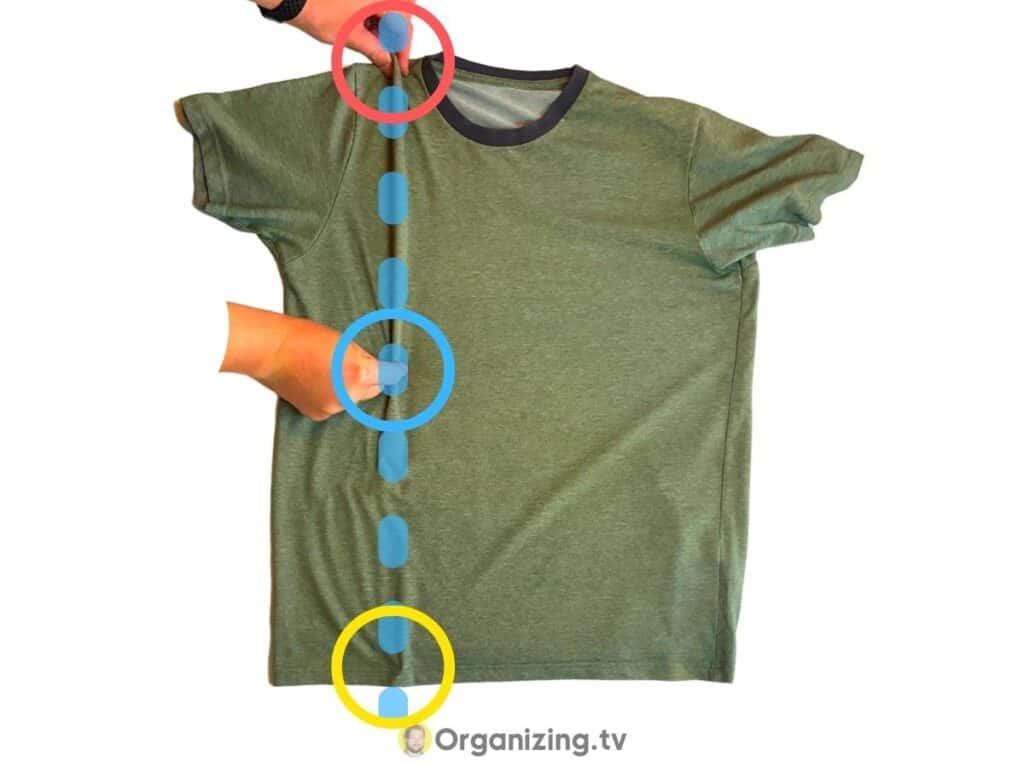
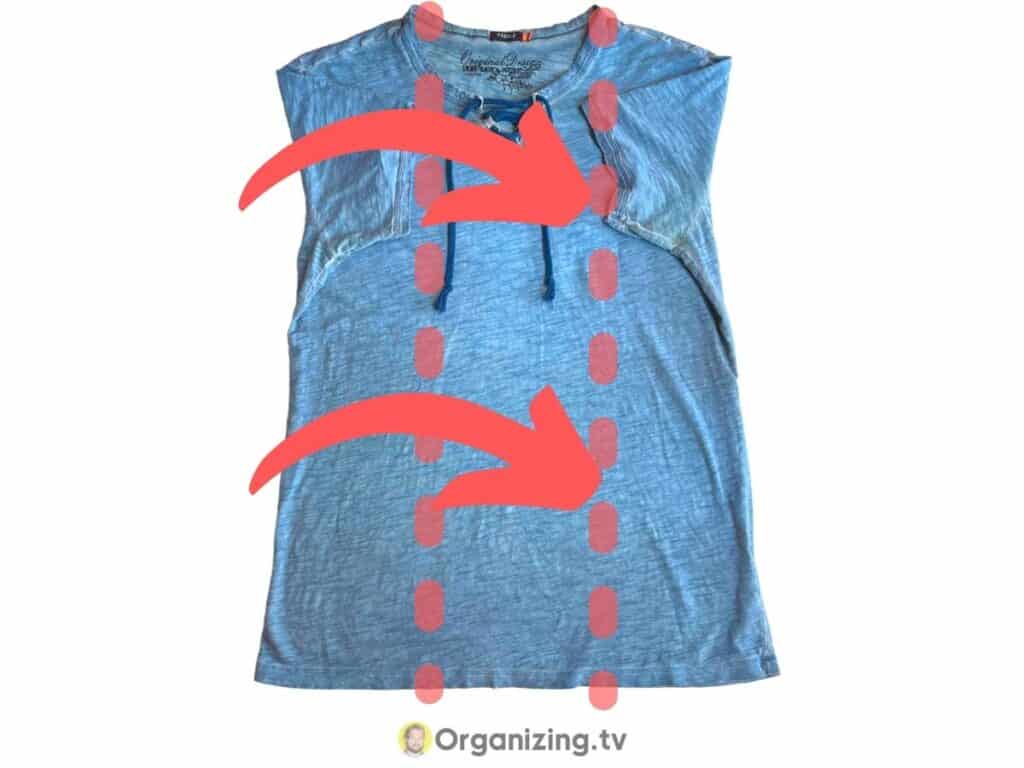
3. Pull your top hand down behind your middle hand and grab the bottom of the t-shirt with the top hand
While holding on top of the fabric, take your left hand and cross it under your right hand that is holding on to the fabric in the middle
With your left hand that is holding the top fabric, grab the bottom of the fabric that is parallel to the fabric that your right hand holding on to as well.
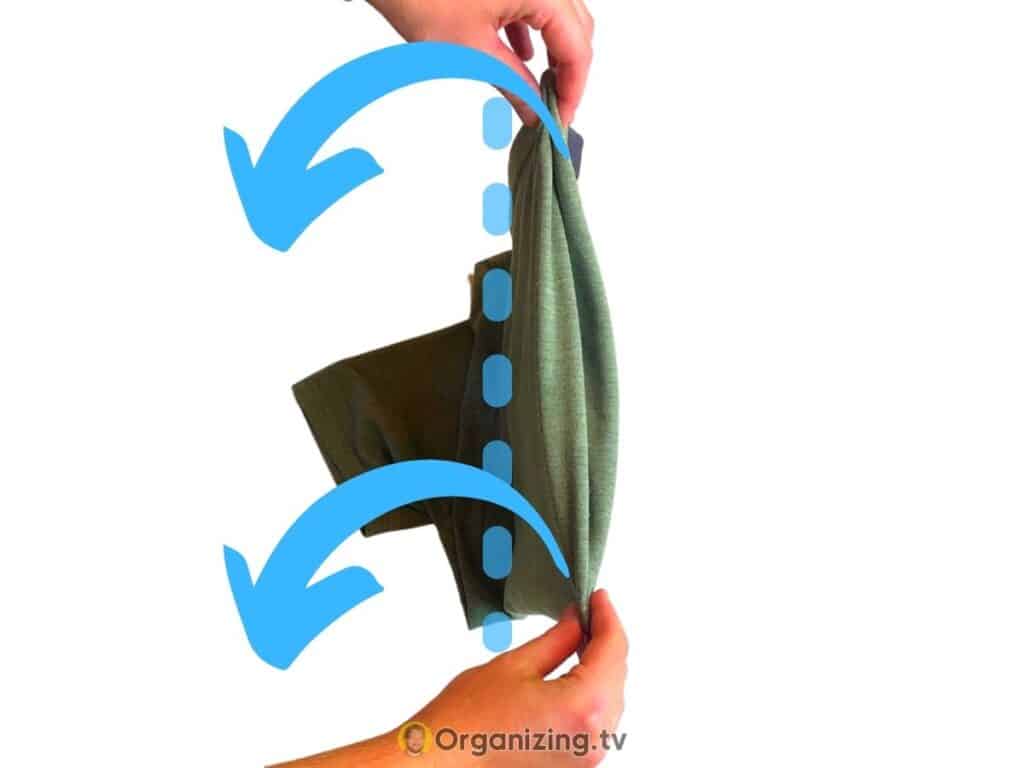
4. Uncross your hands and pull the shirt up of the ground
Now your left hand should be holding on to the top and bottom fabric, and your right hand should be holding on to the fabric in the middle between them.
Uncross your hands while holding on to the fabric.
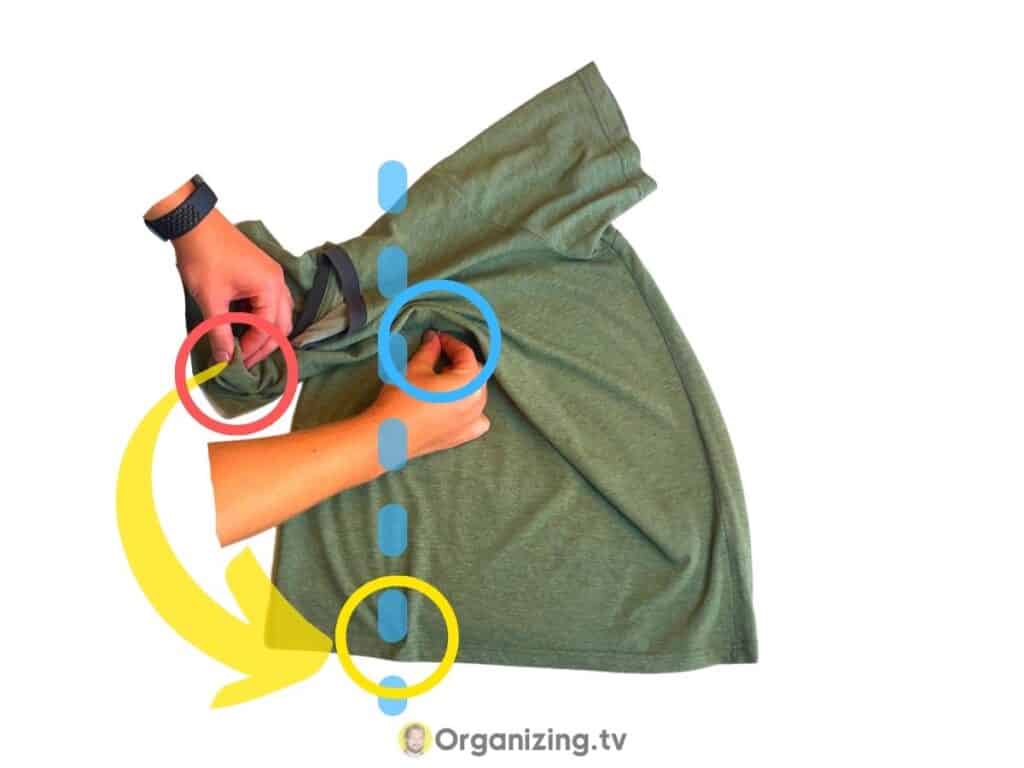
5. Quickly pull the t-shirt forward as you press it slighly down to the surface
Lift the t-shirt up so only the bottom 4 inches (10 cm) is touching the surface. Then pull the t-shirt forward about 4/5ths the length of your t-shirt while pointing it slightly downwards.
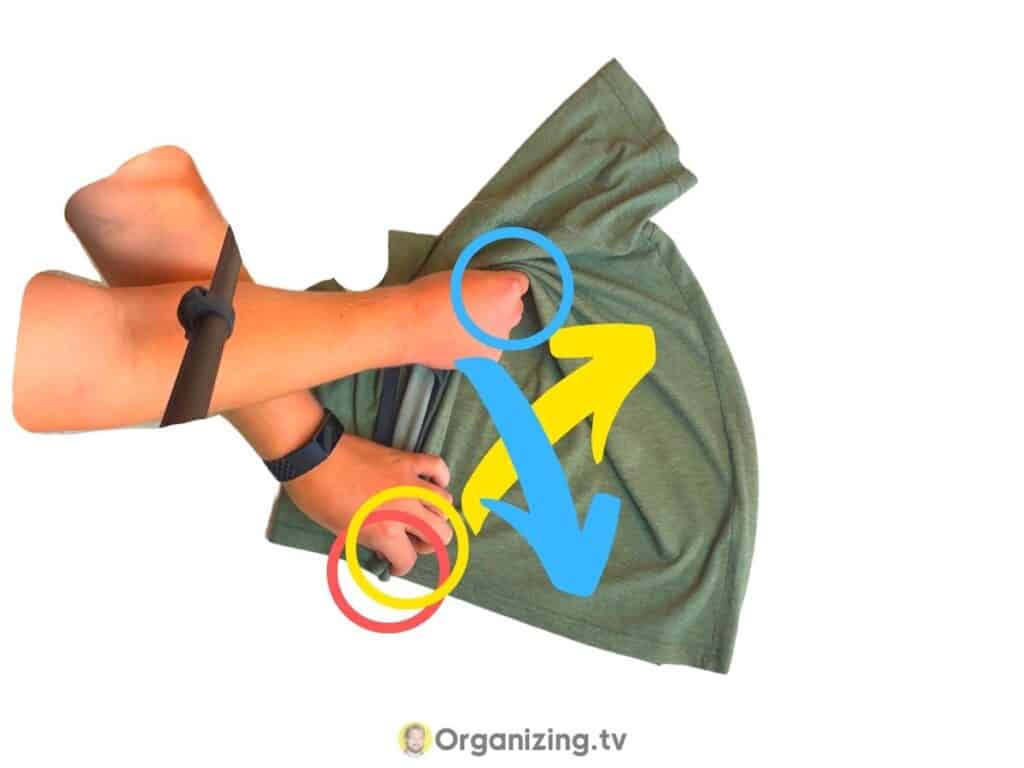
6. Once the fabric on the surface reaches the point where it matches the amount of fabric in step 2, pull the shirt backward and lay it down
This is the tricky part of the fold that requires some practice. Once you reach the point where the fabric on the bottom that is touching the surface matches that amount of fabric folded over where you pinched your fingers, you are ready to fold the t-shirt backward and let it rest on the surface.
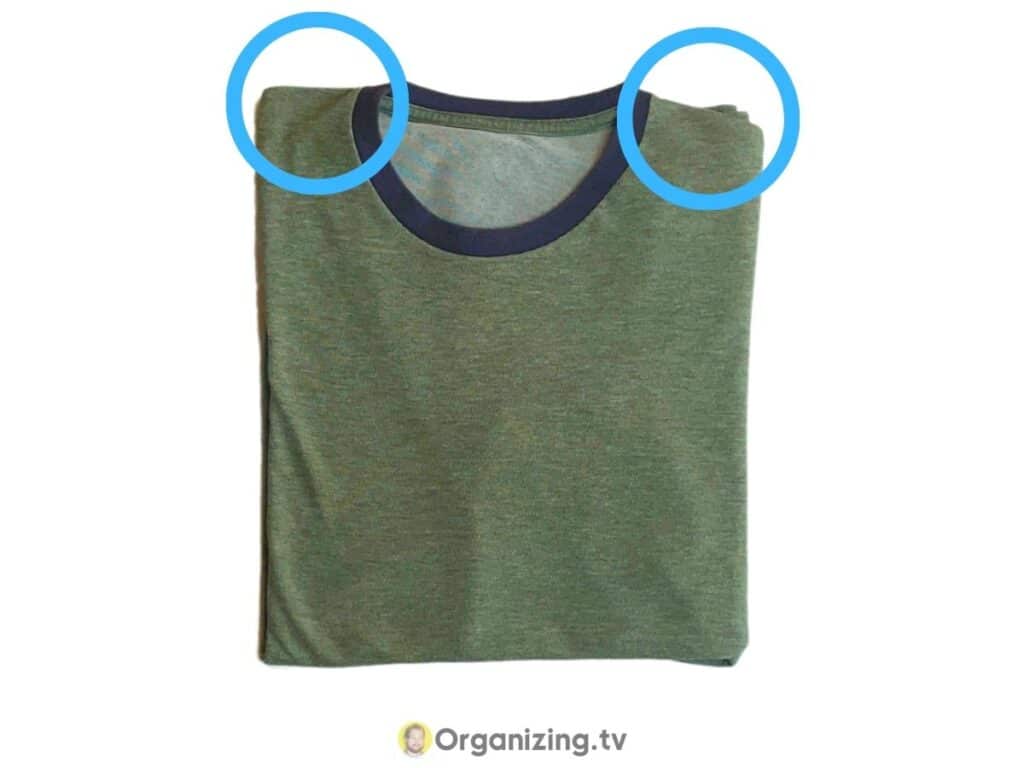
7. The first times you do this, you will need to make some adjustments to the shoulders so they match
If this was your first time doing this fold, the shoulders are most likely not even. That is OK. This fold takes a few rounds of practice to get into your fingers. The most important thing to remember is that everything has to run parallel as you do the fold.
For now, just make some adjustments after finishing the fold, and continue practicing until you get the hang of it.
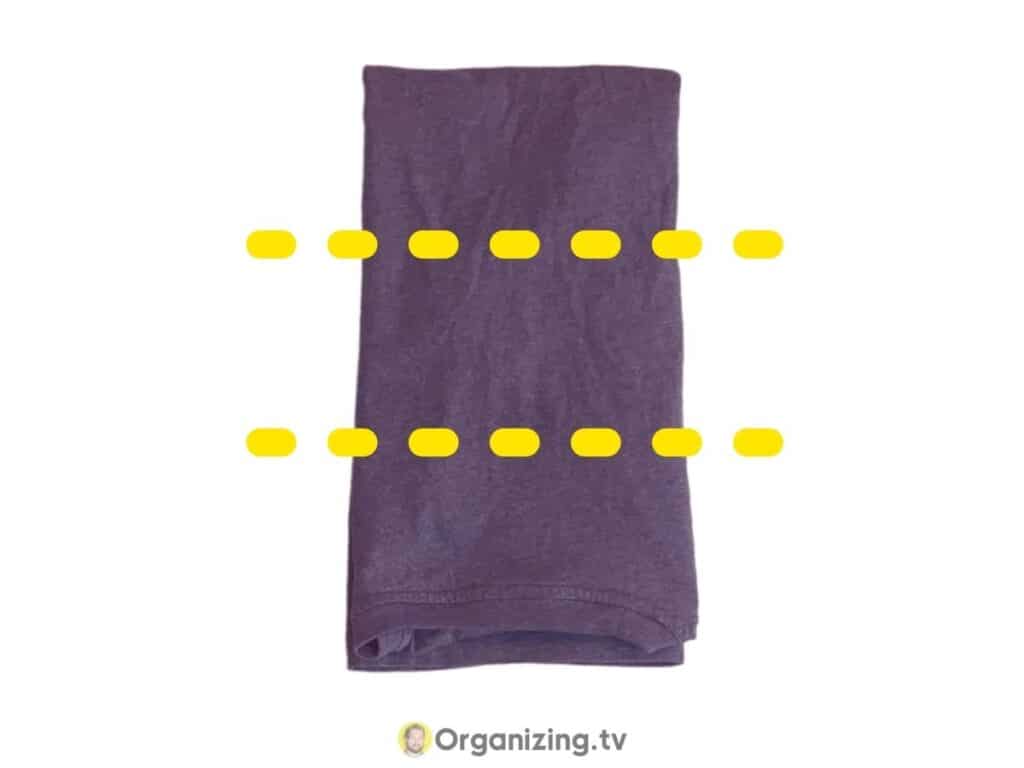
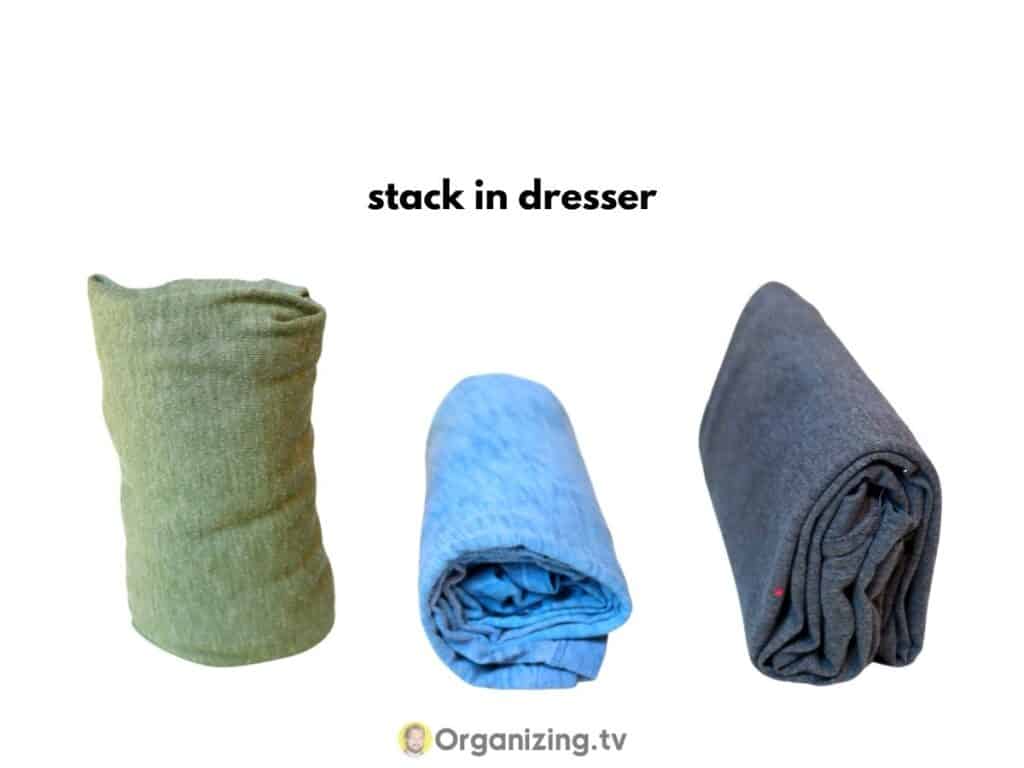
8. You can now stack the t-shirts on top of each other in your dresser
Once you are doing folding the t-shirts, you can stack them on top of each other in your dresser or shelves. This is a great fold for those who don’t like to fold clothes. If you do like folding clothes, continue reading as the best fold is coming up next.
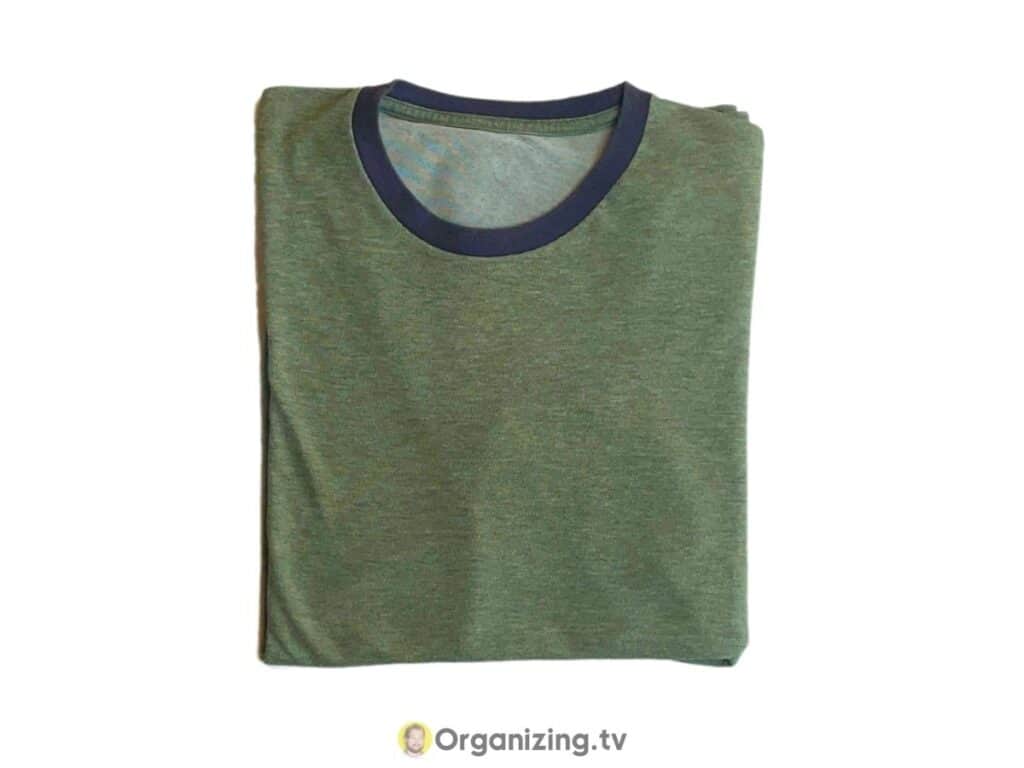
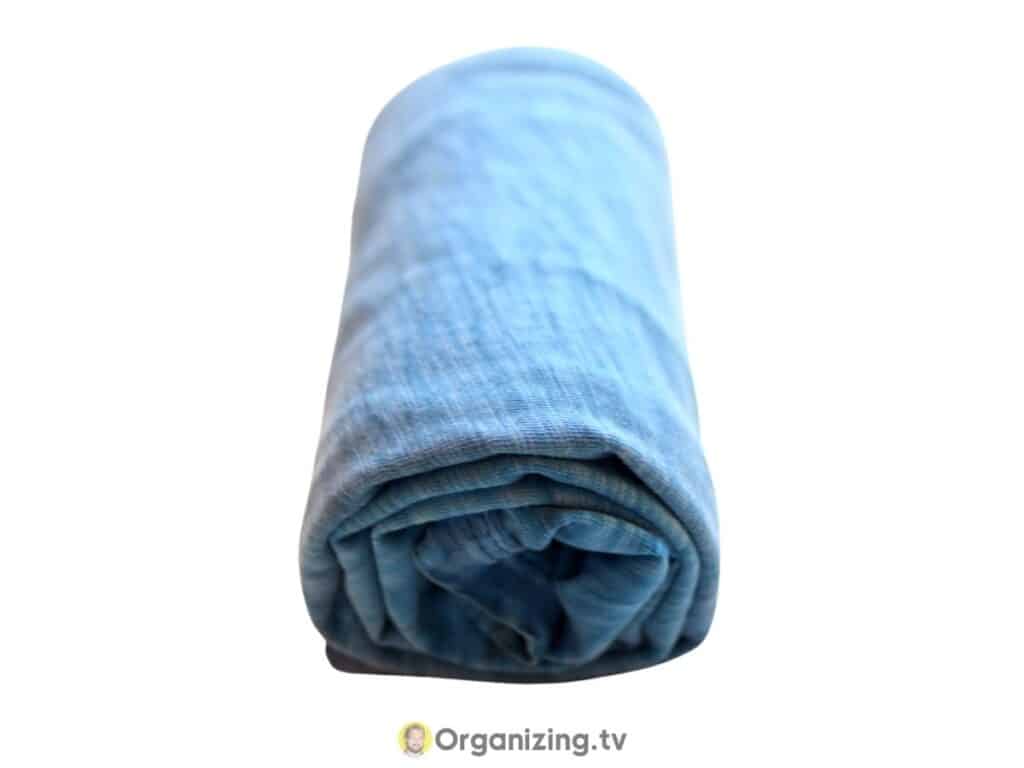
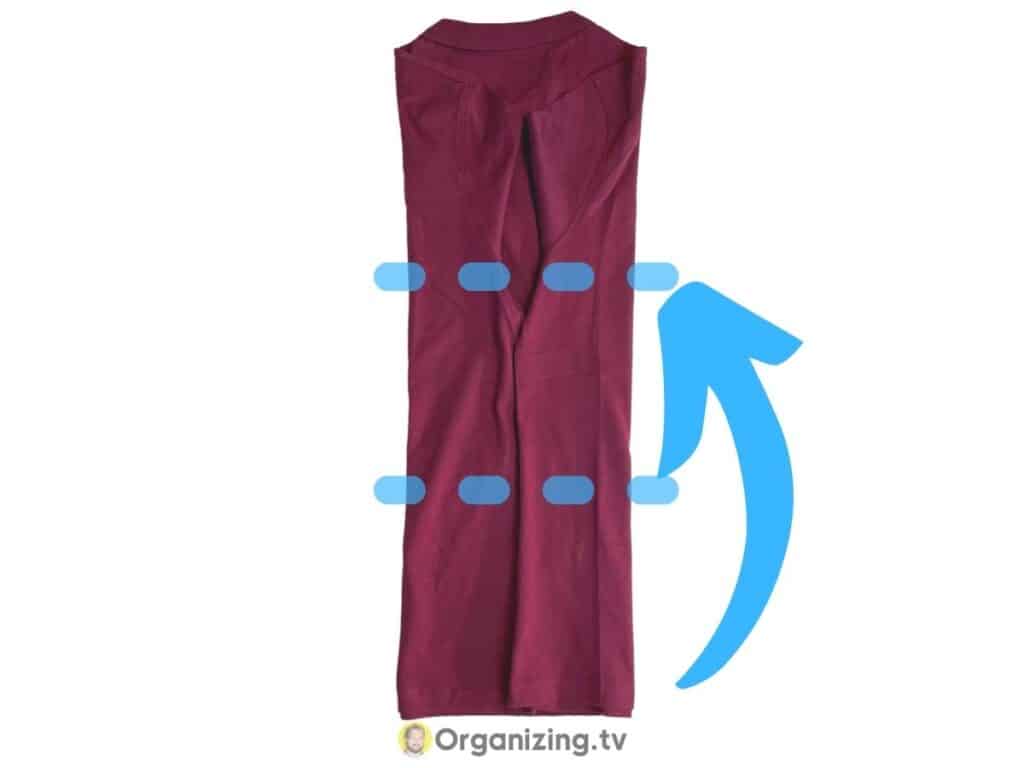
The photo below is how the t-shirt should look like if you did the 2-second fold correctly.
9. Grab another t-shirt and do the fold a few times in a row
This way you will learn to do the fold properly. It can be hard to get it into your fingers at first. Focus on making the shoulders even first. Once you have done the fold for a while, you will easily be able to get the shoulders even.
After that, you can work on the speed and get it up to the fabled 2-seconds. I have added a free, downloadable cheat sheet at the bottom of this article in case you want to refer back to it on your phone, or you could print it out.
This also works great for folding tank tops fast.
Ranger Roll: Fold T-Shirts to Save Space

The ranger roll is the best way to fold t-shirts if you’re looking to save space. It is great for both your dresser drawers and for packing in your suitcase for travel.
This is because we will roll them up to a small t-shirt first, then we will add a pocket to keep the roll together and compress the size of the t-shirt down further.
This is by far my personal favorite, and it is the one I primarily teach in the folding clothes to save space premium guide. You can check it out if you want to reorganize your wardrobe and make some space in your dresser.
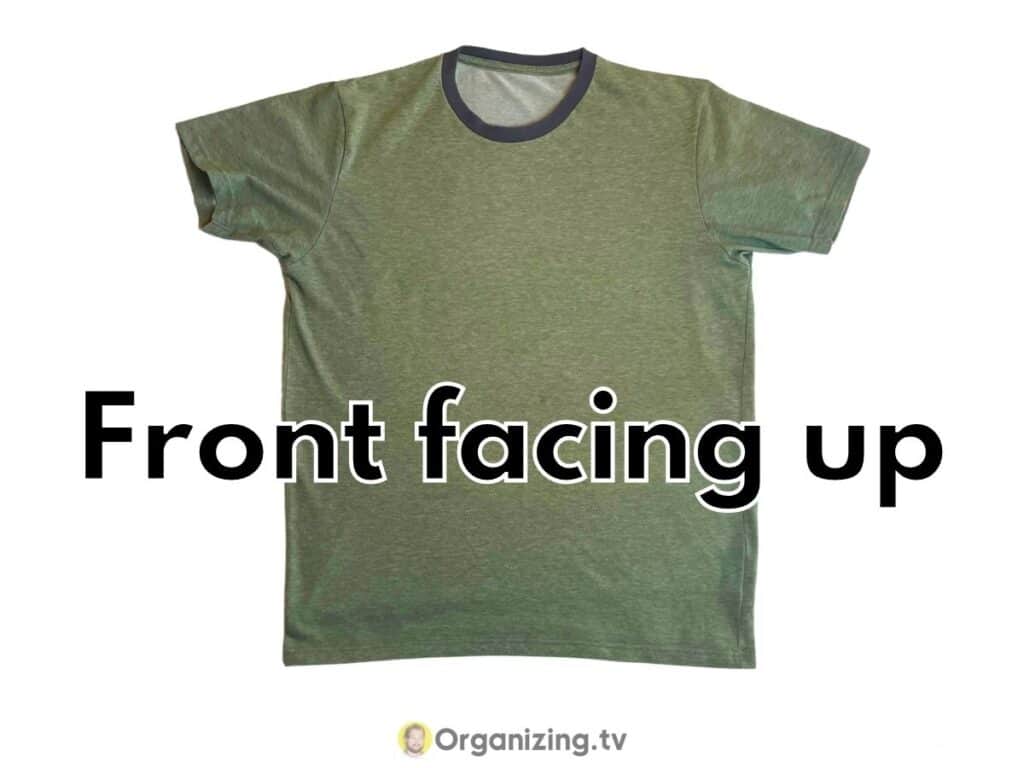
1. Lay the t-shirt with the front facing up
Lay the t-shirt down flat on an even surface and make sure there are not uneven parts of the fabric.
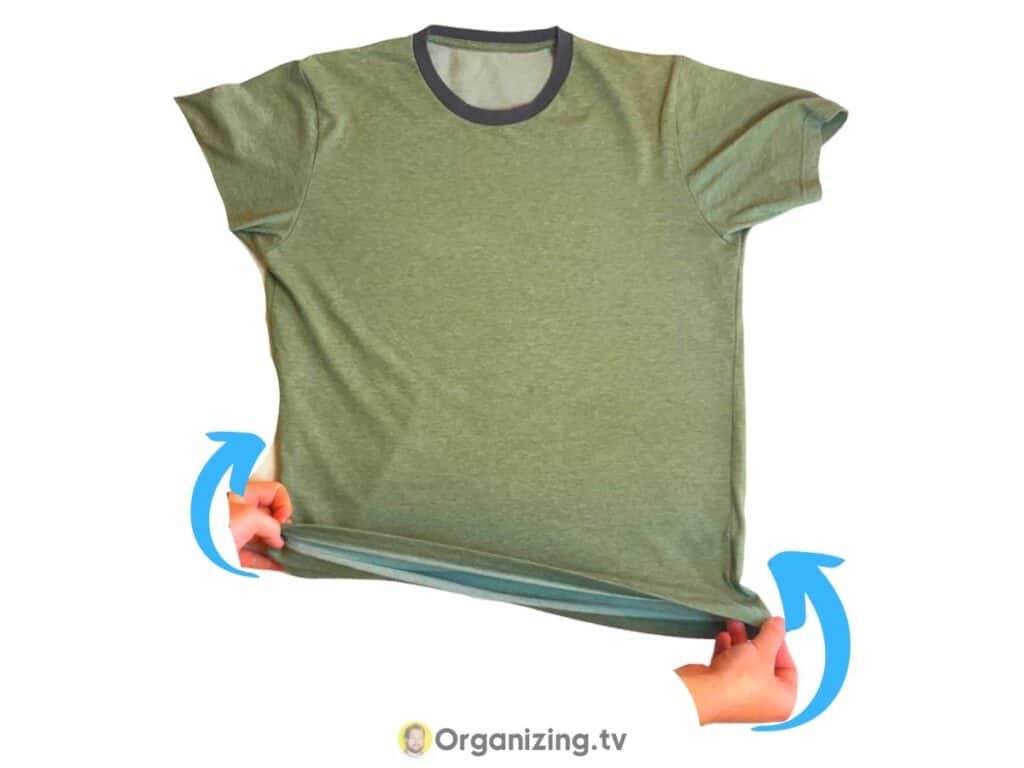
2. Fold the bottom of the t-shirt inside-out
It is easiest to flip the fabric at the bottom of your t-shirt inside out using both your hands at the same time. We are going to use this fabric to secure the ranger roll later.
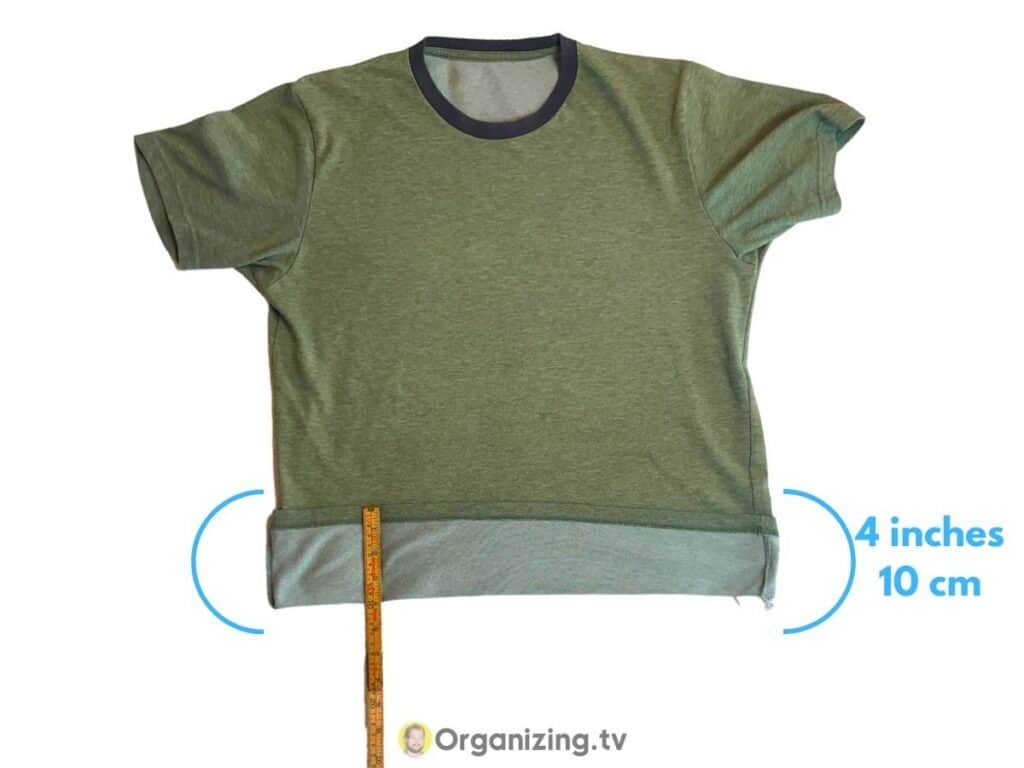
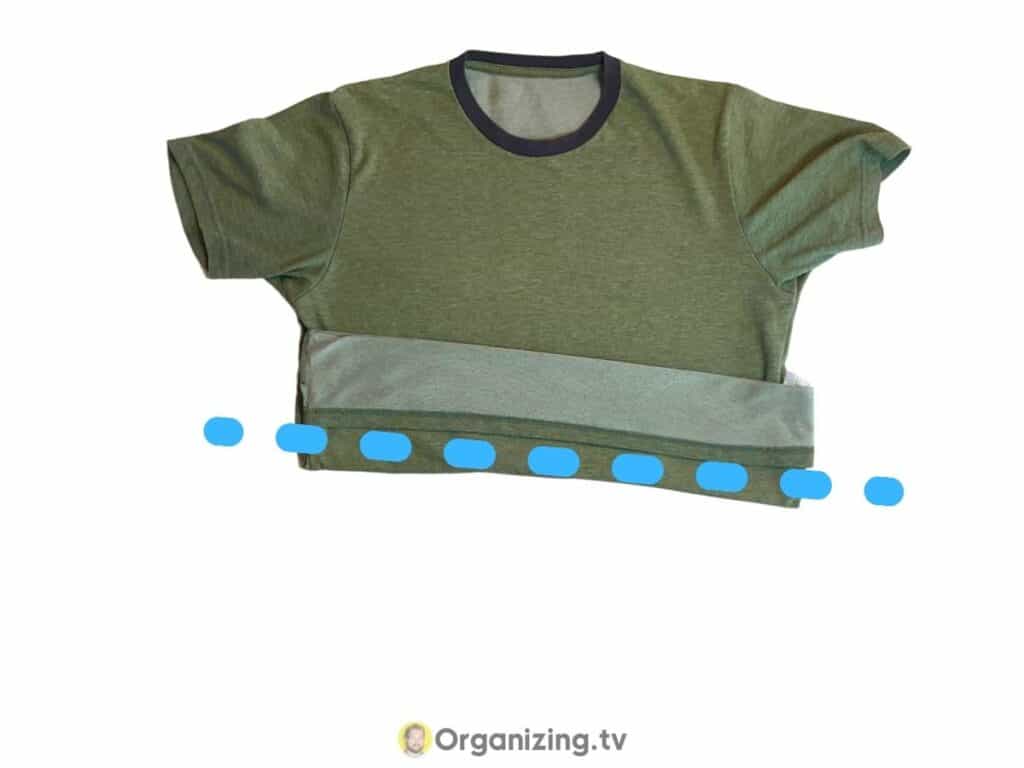
3. Pull the bottom of the shirt up about 4 inches (10 cm)
The first time you do the ranger roll make sure you get the measurements right. If you are unsure about the measurements it is better to slightly overshoot it, as that will make the fold easier later on.
4. Adjust the backside of the t-shirt so it matches the front
A common mistake when ranger rolling t-shirts is to not make sure that the backside is properly lined up like the front. So flip the bottom of the t-shirt over and even it out. As you get comfortable with the fold, you won’t need to do this anymore.
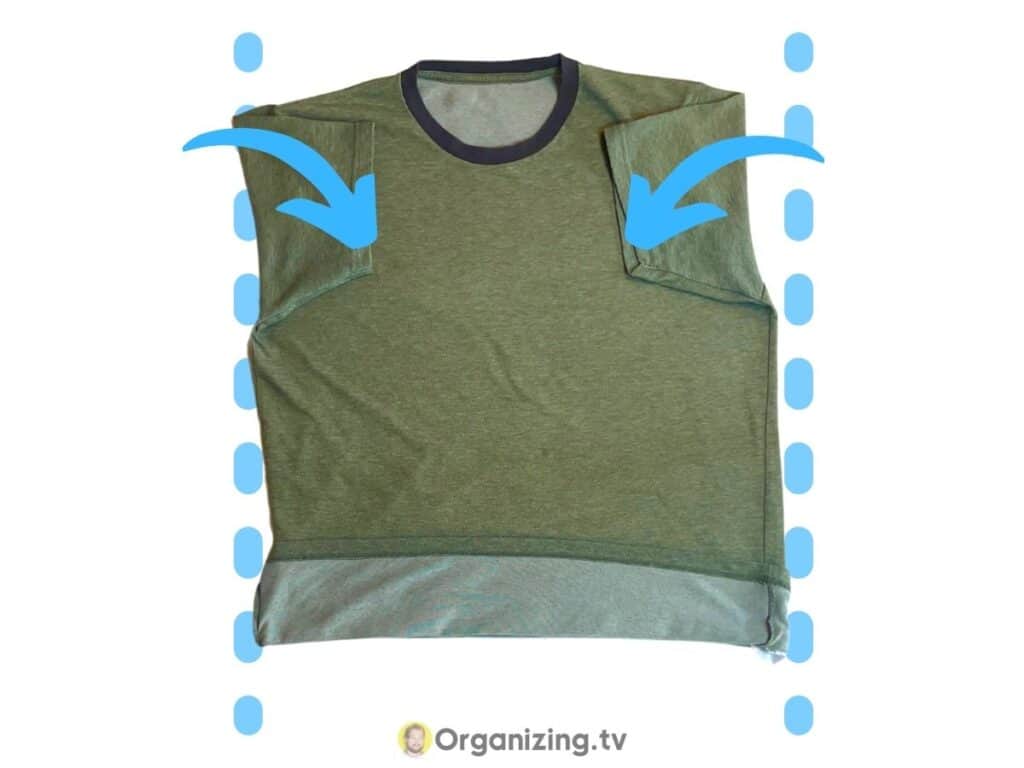
5. Fold in both sleeves to create a rectangle shape of your t-shirt
Fold both of the sleeves in so that the t-shirt ends up shaped like a rectangle. If there are some dents in the sleeve areas that is OK.
6. Fold the t-shirt in 1/3 of the way from the left
Fold the left side of the t-shirt in. Take 1/3 of the shirt and fold it over so it passes the collar of the shirt.
Alternatively, if you want a taller and thinner roll, you can fold the t-shirt in 1/4 of the size of the t-shirt from left and right so that they meet in the middle of the t-shirt. This will create a thinner and taller roll. Fold both sides in and skip the next step (7) then continue like normal to complete the tutorial.
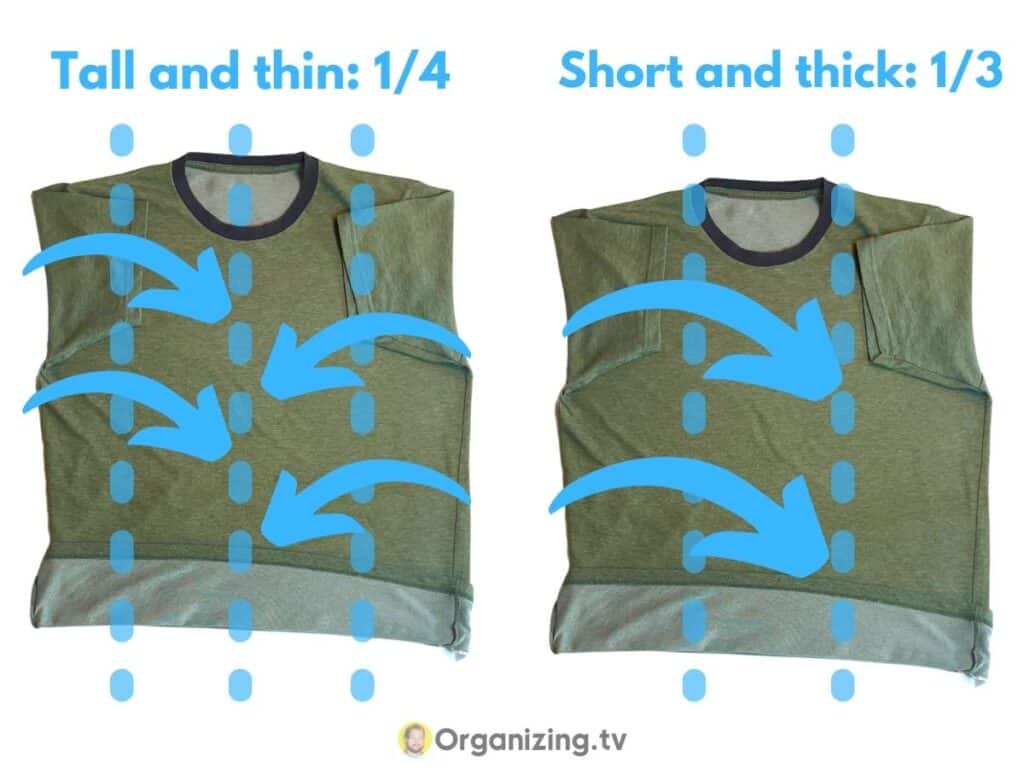
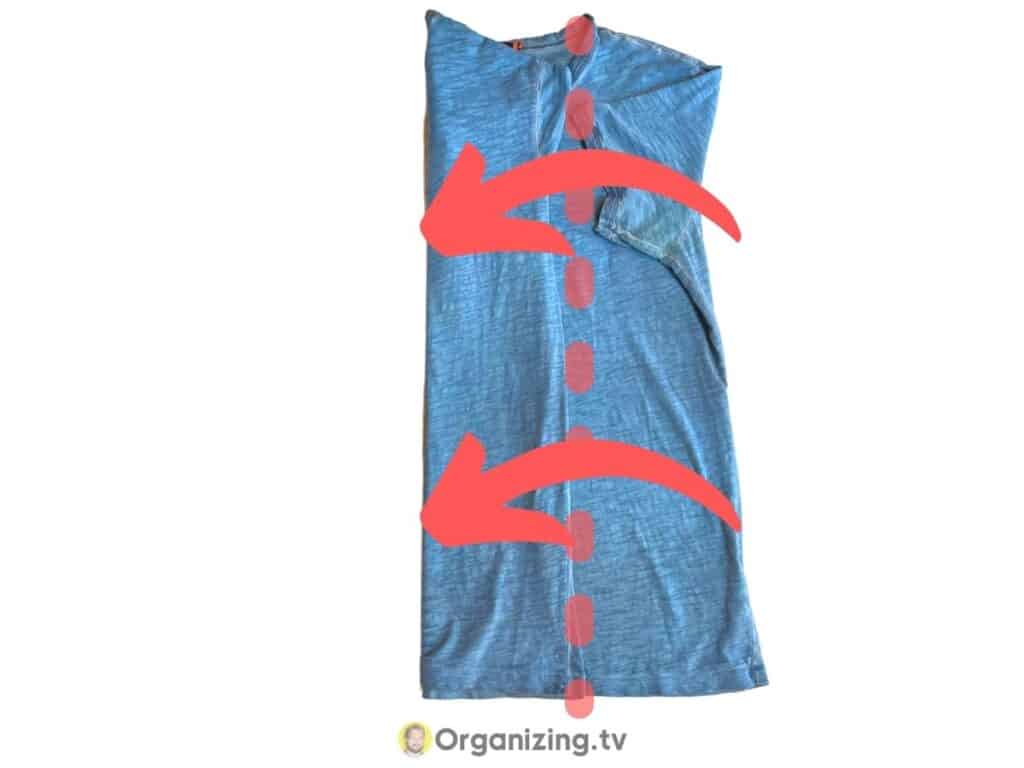
7. Fold the right side in 1/3 of the way so it overlaps the left site
Fold the right side over 1/3 of the fabric as well. This fold should overlap the entire fold from the left side. Make sure that the edges line up neatly.
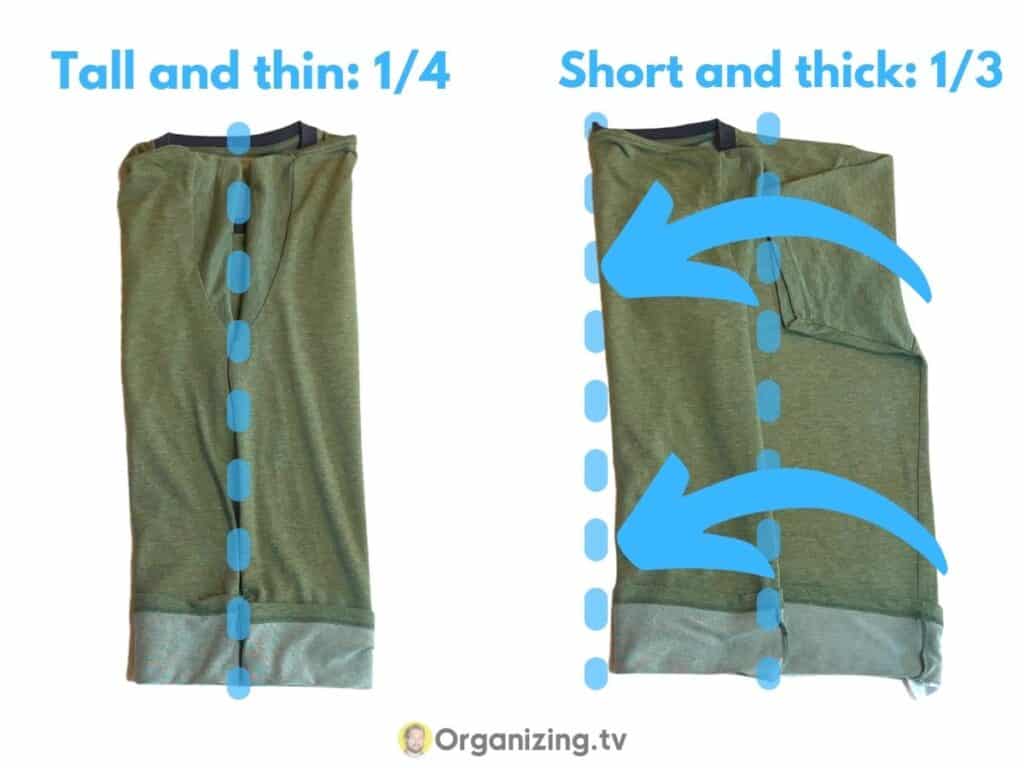
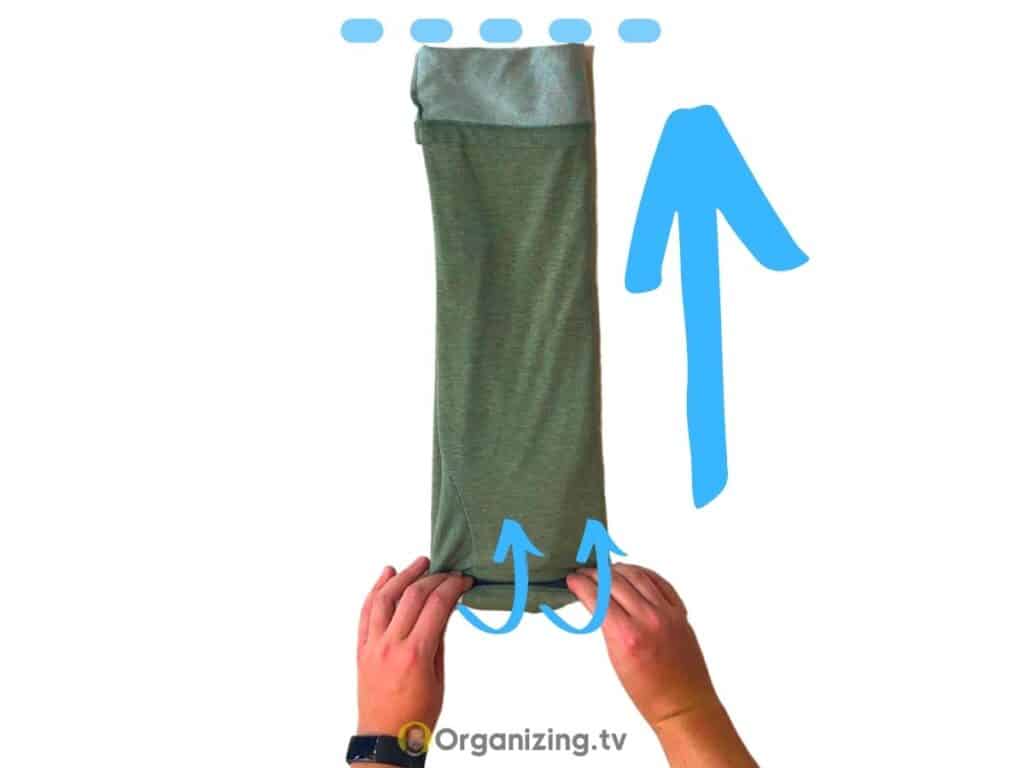
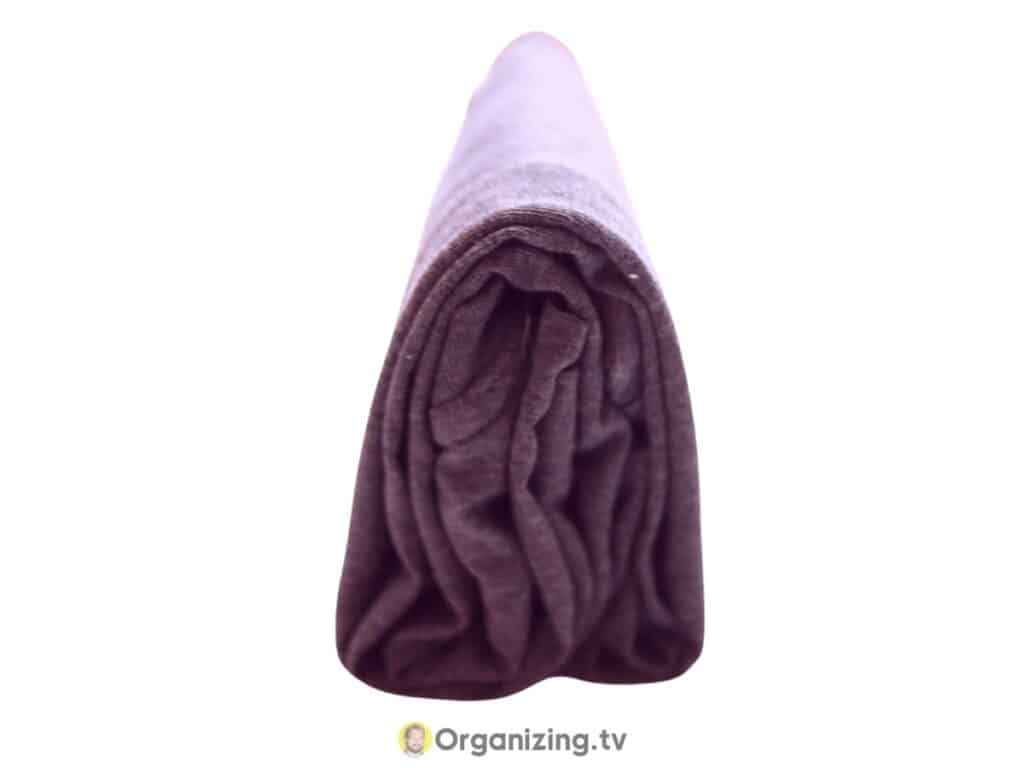
8. From the collar, roll the t-shirt down to the bottom
Roll from the collar all the way up to the end of the inside-out part of the t-shirt.
It is best to use medium power when rolling up the t-shirt. You should feel a slight tug on the back of the fabric as you roll up the t-shirt.
You can roll it tightly if you prefer, but it has a tendency to crease up more then. If you roll it very tightly you can reduce the size of the inside-out part at the bottom in the first steps of the fold.
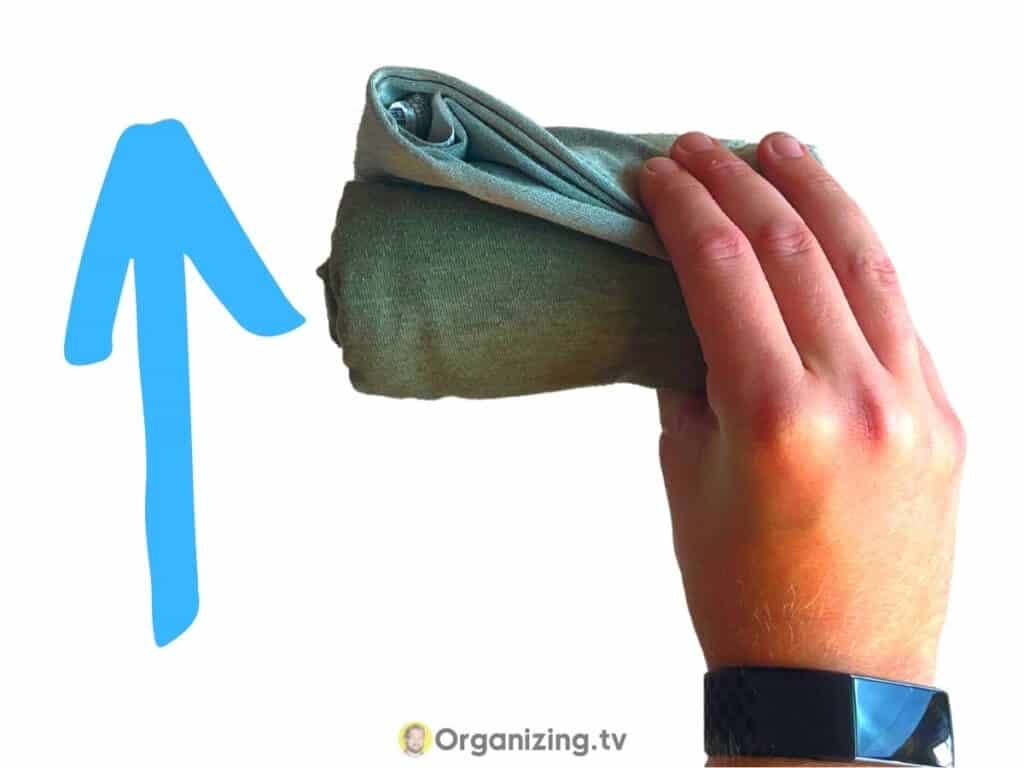
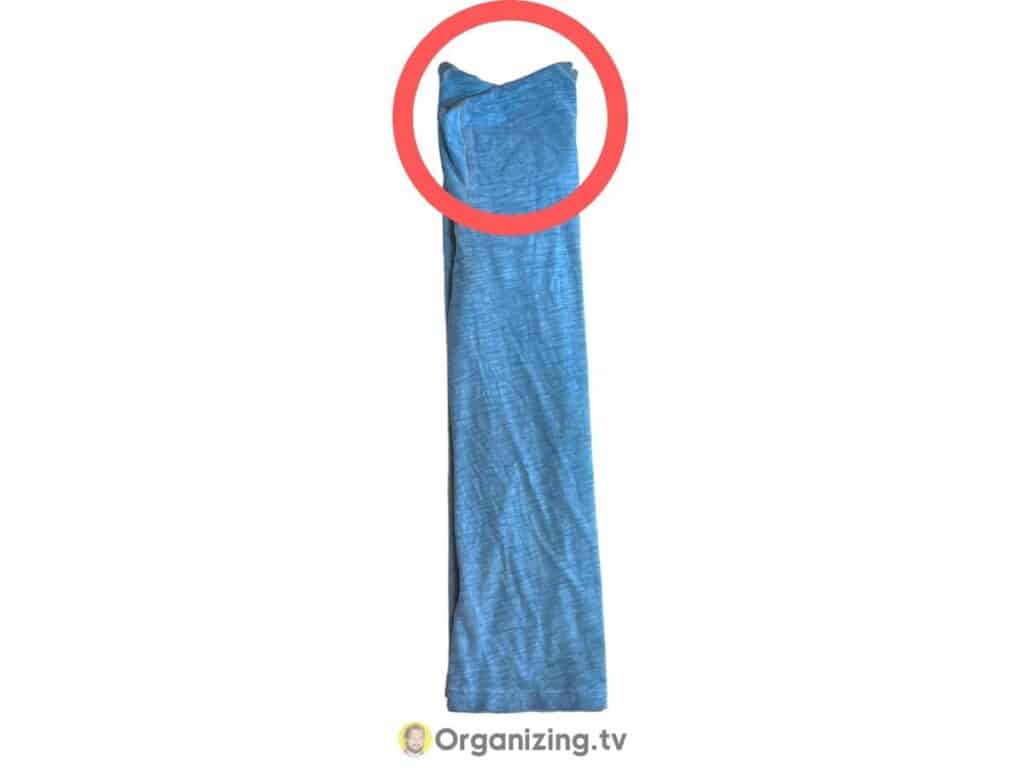
9. Lift up the roll, making sure to hold on to the end of the roll so it holds together
Once the roll is finished, lift up the entire roll with your right hand. Make sure you grab hold of the entire roll at one of the ends so it doesn’t unravel as you lift it up.
Flip it one of the tall ends upwards so that you’re holding on to a lower part of the roll with your hand
You should hold onto it slightly harder than normal as we are going to work with the inside-out fabric next.
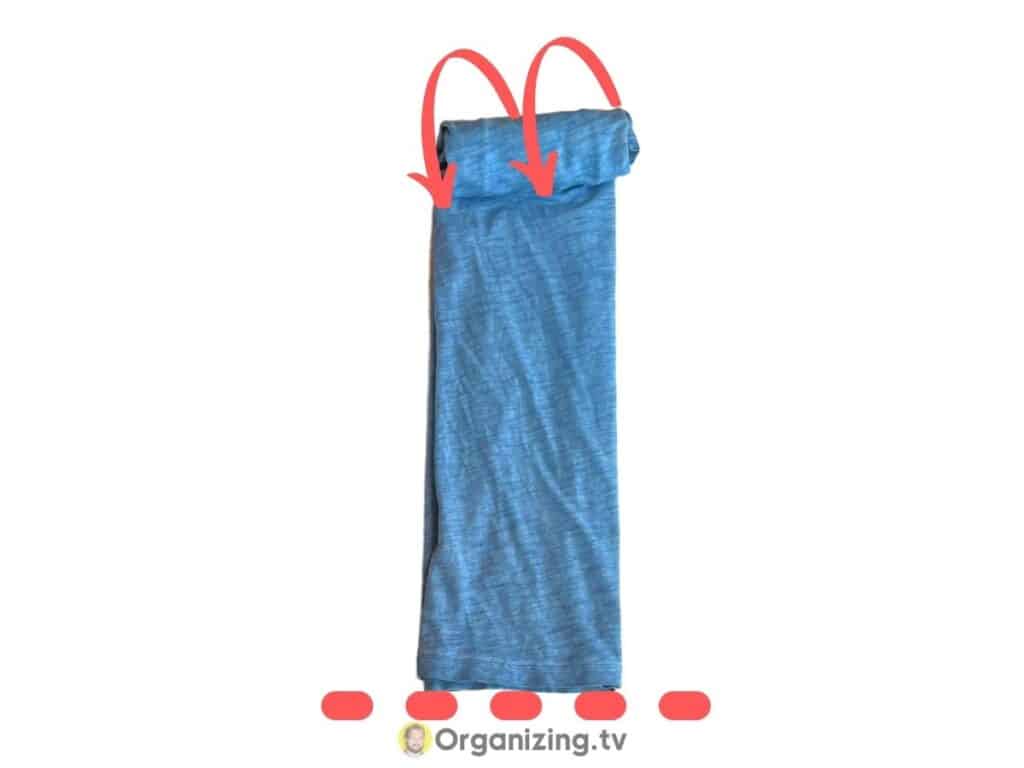
10. Flip the top part of the inside-out fabric over the top of the roll
As you are holding on to the roll with your right hand, you will take your left hand and flip the inside-out fabric at the bottom of the t-shirt over the top of the t-shirt.
11. Turn the roll around so the other end faces up
The easiest way to turn the roll around is to grab the secured part of the roll with your left hand and turn the roll around.
Feel free to change your hand if you feel it is easier to flip the roll over with your left hand.
12. Flip the remaining inside-out fabric over the rest of the roll
This side of the inside-out fabric should be easier to fold over than the other one since the fabric is already stretching that way.
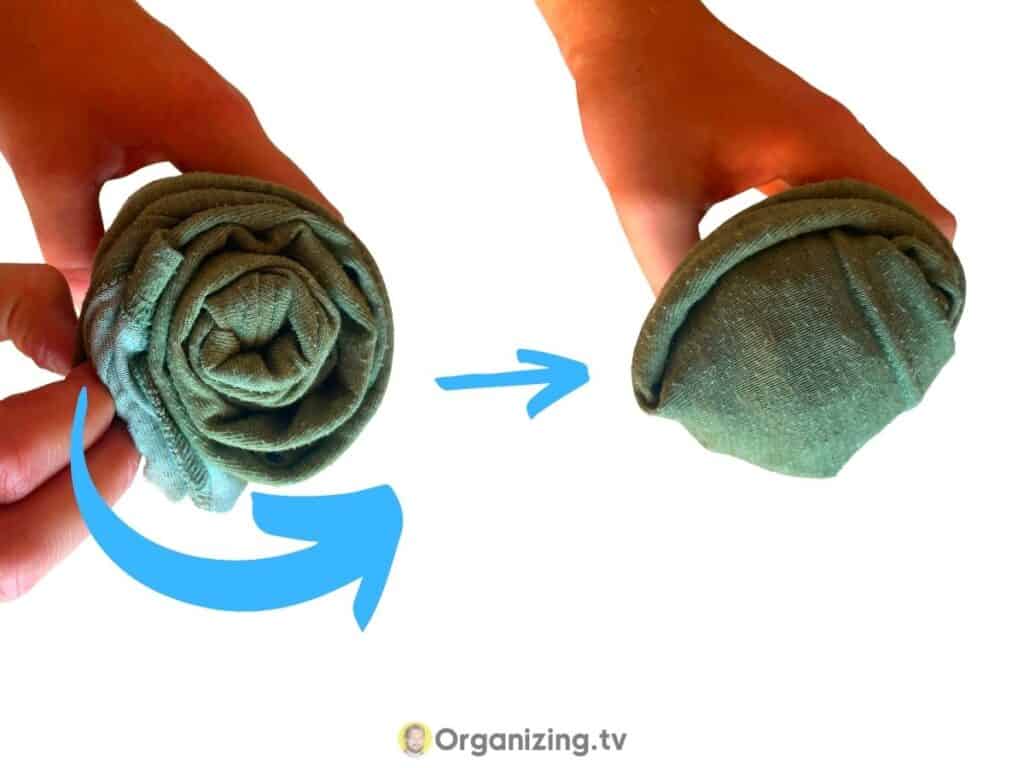
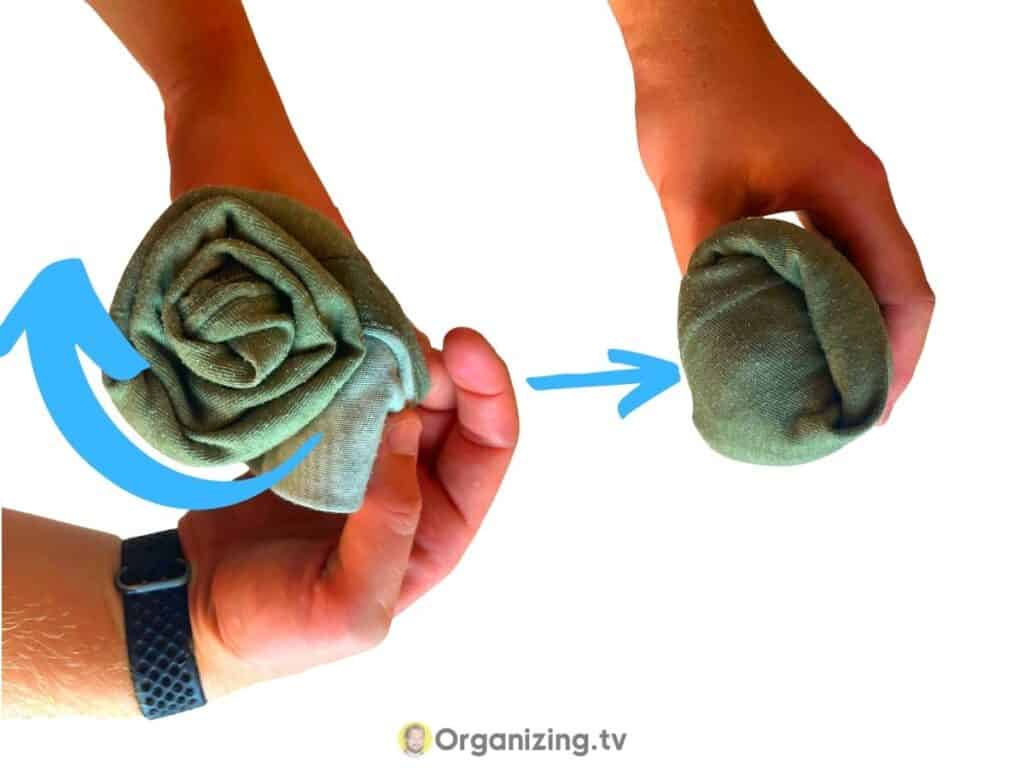
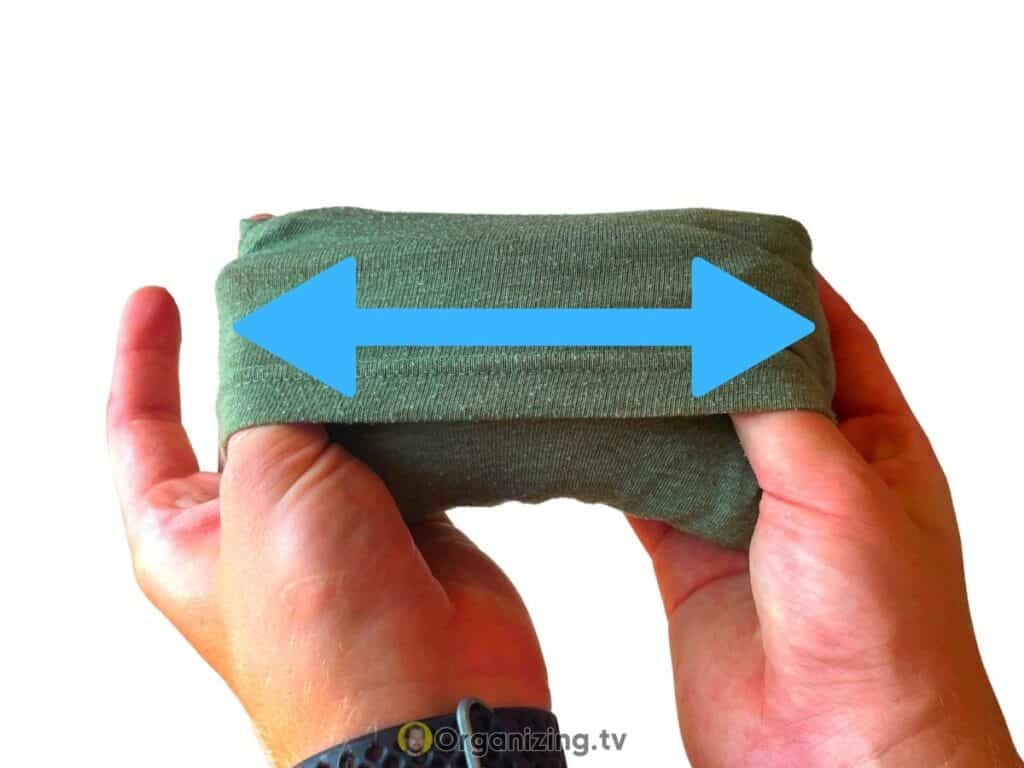
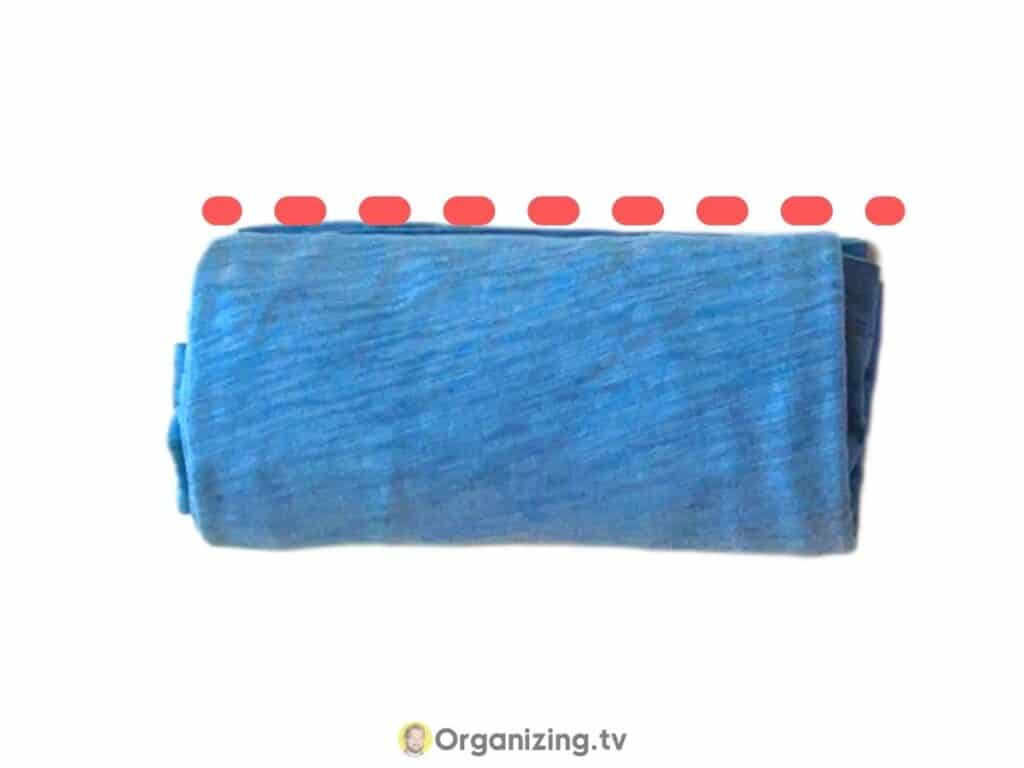
13. Stick your thumbs inside the pocket and adjust the rolls
Here is a ninja-tip that you won’t ever find anywhere else. Stick your thumbs (or index fingers if that is easier for you) inside the previously inside-out fabric while holding onto the back with the rest of your fingers. We are going to make some adjustments.
Start by pressing your thumbs into the edges of the fabric to even it out.
You can also massage the fabric a bit from the outside if the roll looks uneven. The ranger roll is a hard folding technique so don’t feel back if you can’t get it on your first try. It is worth practicing to learn.
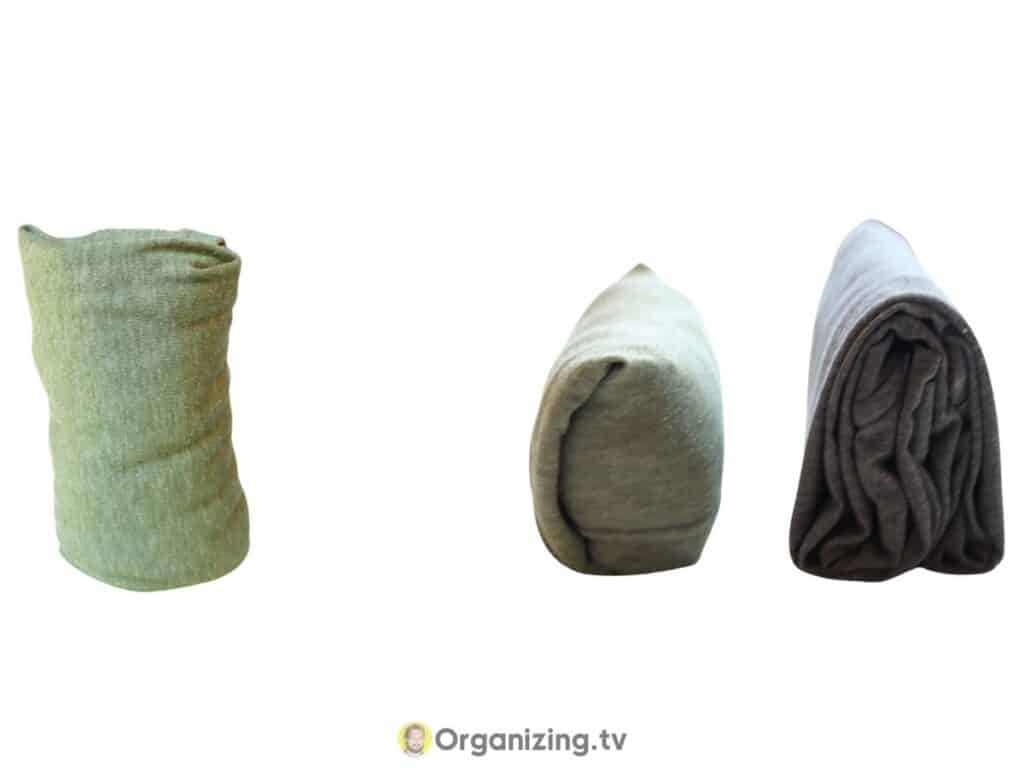
14. Stack the ranger-rolls in your dresser drawers, suitcase, or on your shelves
This military roll can be stacked both vertically and horizontally in your dresser, suitcase, and on your shelves. I usually stack t-shirts vertically in my drawers.
Pro-tipI Use these IKEA Skubb organizing boxes (Amazon paid link) to organize my dresser drawers with the block rolling system.
File Fold: The Neat and Fast T-Shirt Fold

File-folding your t-shirts is a great way to keep them organized, especially in deep drawers as you get a great overview of your t-shirts from above when you fold them like this.
This is also the folding style that Marie Kondo uses in her KonMari method which is an excellent organizing system.
Now let’s take a look at how to file fold t-shirts in detail.
1. Lay the t-shirt down on a flat surface with the front facing up
Lay your t-shirt on a flat surface with the front facing up. Make sure it is an area you are comfortable working from.
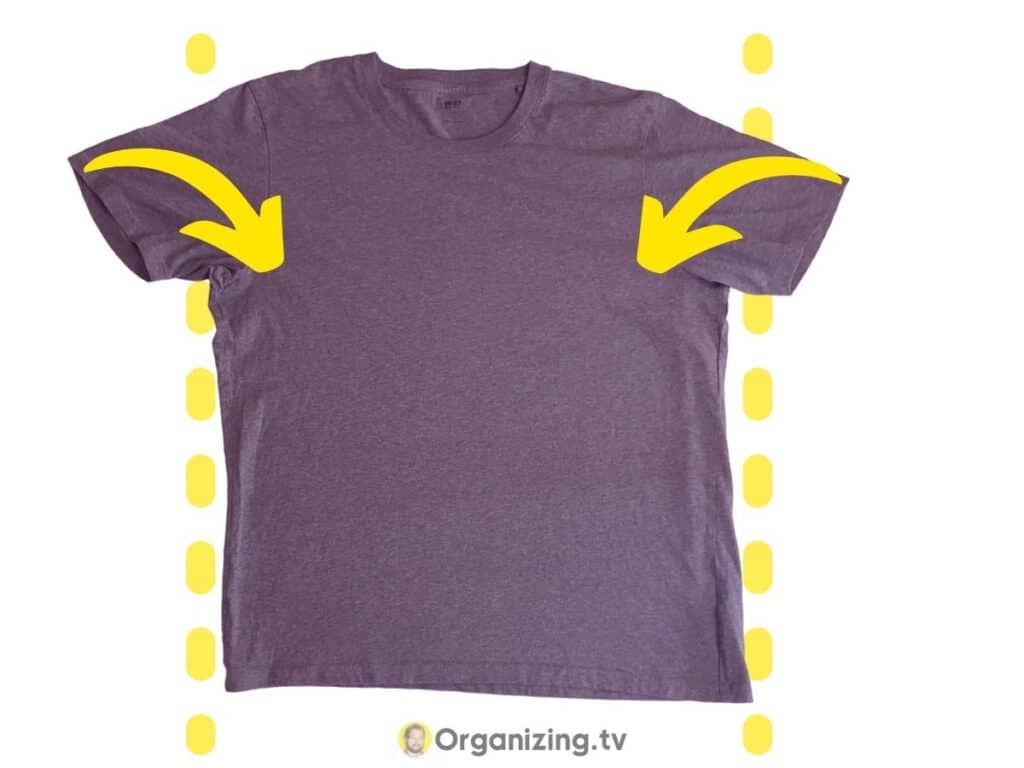
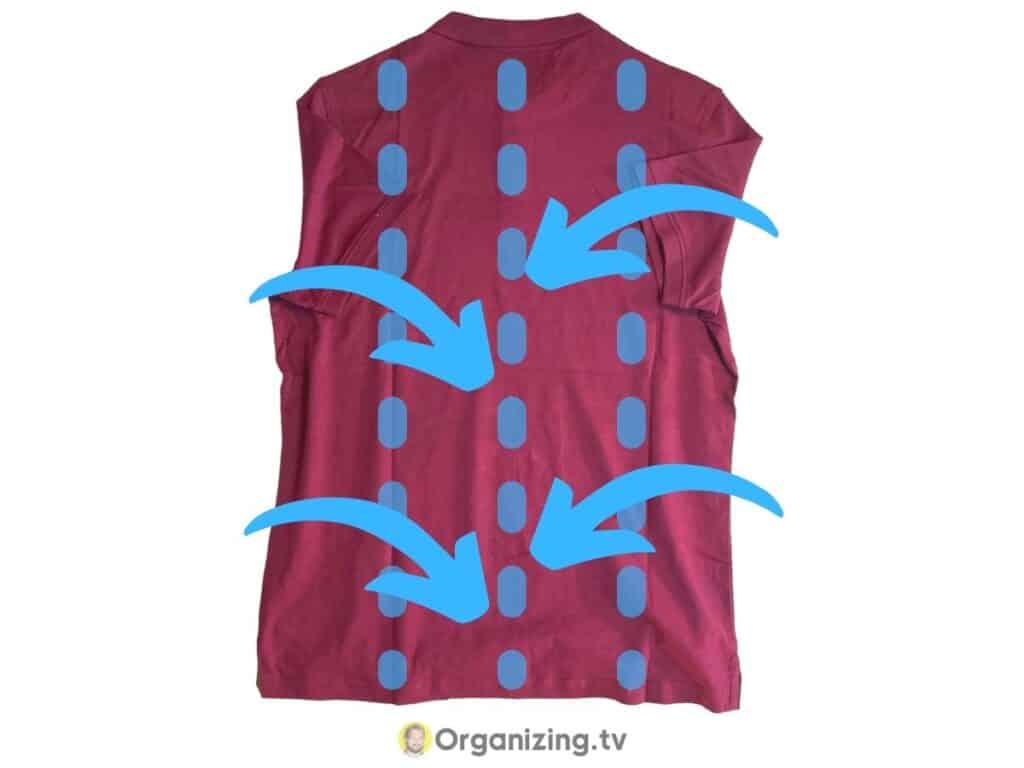
2. Fold the arms in on both sides to create a rectangle
When you fold the arms in you make a rectangle with is very easy to work with. Try to make relatively straight lines as you fold the arms of the t-shirt in.
3. Fold in the left side of the t-shirt one-third of the way
From the left side, we are going to fold the t-shirt over a third of the way so that it covers the next third of the t-shirt as well.
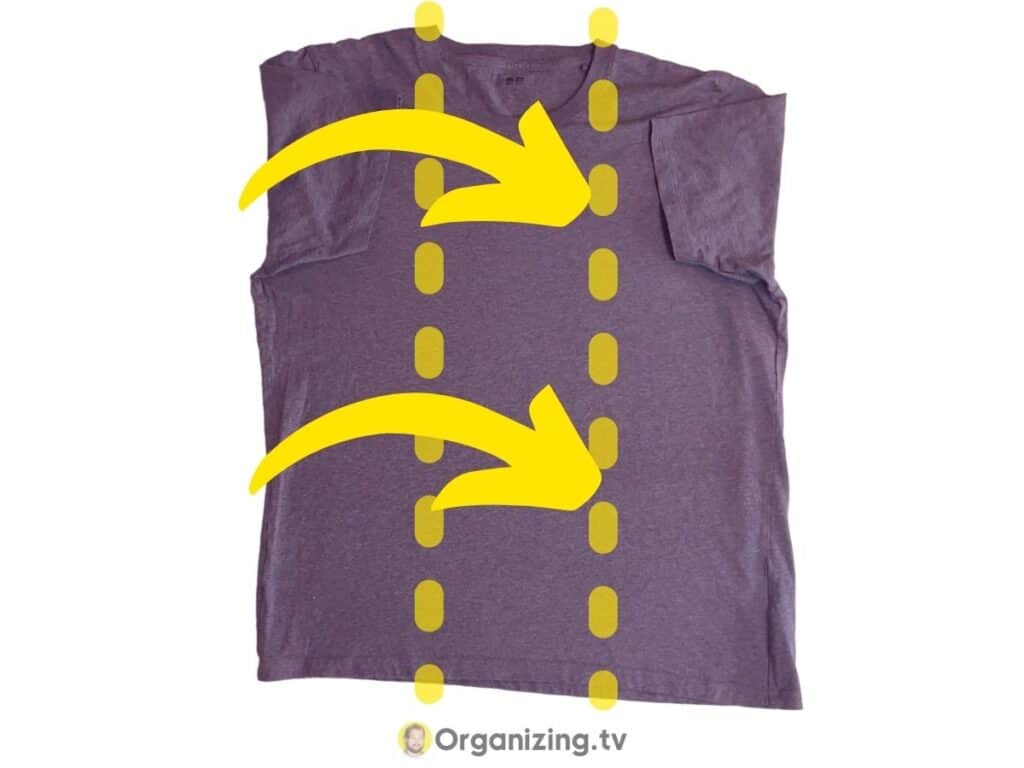
4. Fold the right side in one-third of the way so it overlaps the entire right side completely
Now that the left side is covering most of the t-shirt, when we fold the right side over a third of the original size of the t-shirt over, it should overlap the entire left side of the t-shirt.
Make sure that the fold lines up nicely at the edges.
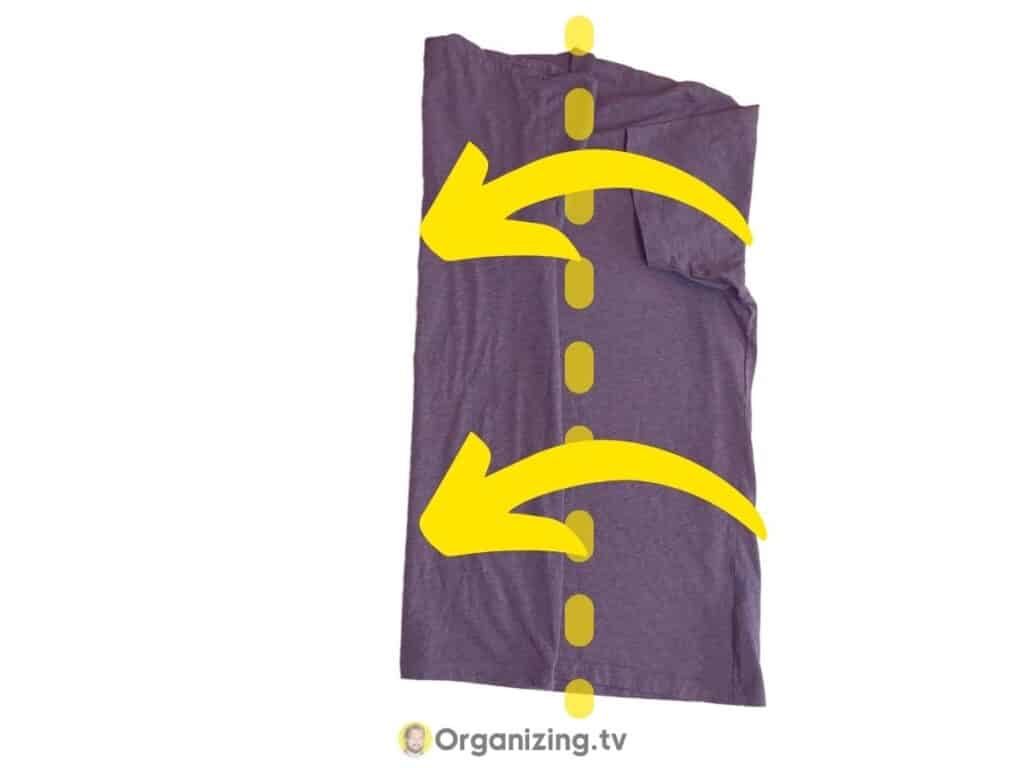
5. From the top, fold the t-shirt down in half so it lines up with the bottom
Mark the middle of the shirt with your hand, and fold the t-shirt in half from the top down.

6. Split the t-shirt in three, and fold the part with the collar and bottom up one-third of the way
Mark the three-thirds of the t-shirt with your hands the first few times you do this fold. As you get used to the fold you won’t need to do this anymore, but for now, do it.
Fold the part with the collar and bottom up 1/3 of the length of the t-shirt.
Pro-tip: make it slightly less than 1/3 as it will be easier to stack the t-shirt later
7. Fold the t-shirt down the last one-third of the way so it meets the bottom
Fold the other end over and make sure it lines up perfectly with the bottom of the fold.

8. Adjust the t-shirt so it is even on all the sides
If you didn’t perfectly match the ends up during the last step, make sure to do it now. We are going to stack the file-fold next.
The fold should look like the photo below.
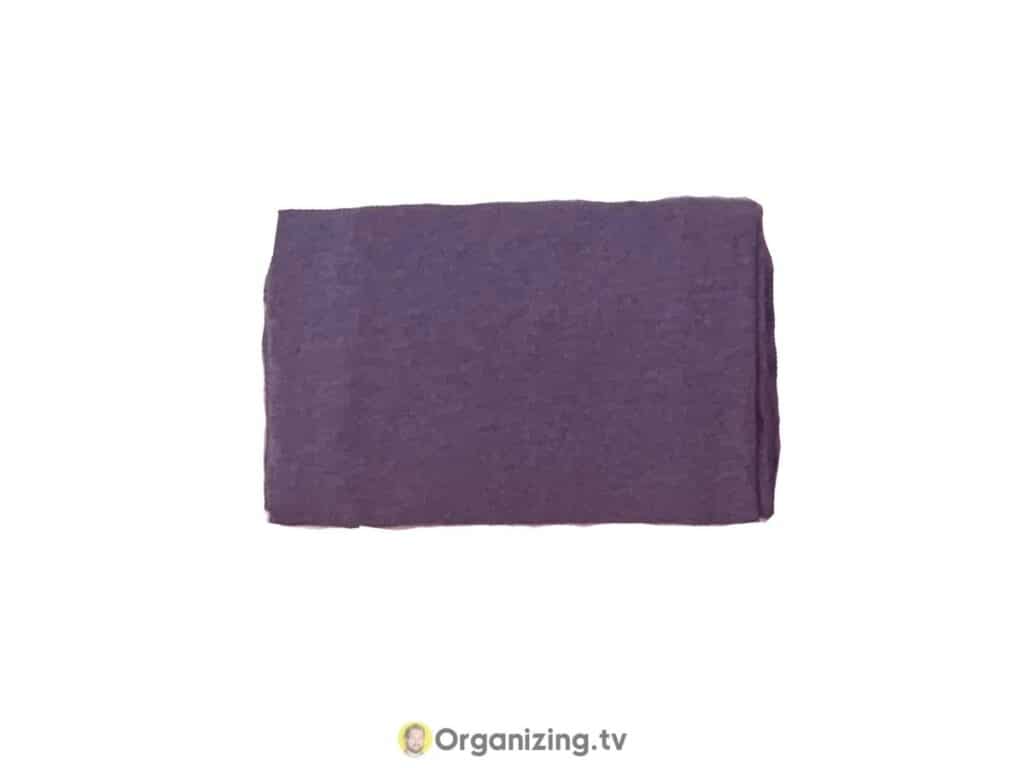
9. Stack the t-shirt horizontally with the section of the collar and bottom facing down to support the file-fold
Stack the file-folded t-shirt with the part with the two folds down to the surface. The single-fold should point up like in the photo.
If it isn’t standing on it’s on, feel free to press the top in a little, and the bottom slightly out.
10. Stack multiple file-folded t-shirts next to each other in your drawer or shelf so they can support each other
If you stack multiple file-folded t-shirts or shorts for that matter their structure will support each other.
Once again I recommend these boxes from IKEA, but you can also use plastic or cardboard boxes and place them in your dresser drawers.
These kinds of support systems for the file-folded clothes are worth the hassle as they will make the structure of the file-folded clothes a lot stronger. The main weakness that file-folds have is that they easily unravel.
If you want to see a great way to fold clothes that is both space-saving, quick, and crease-proof, you should continue reading.
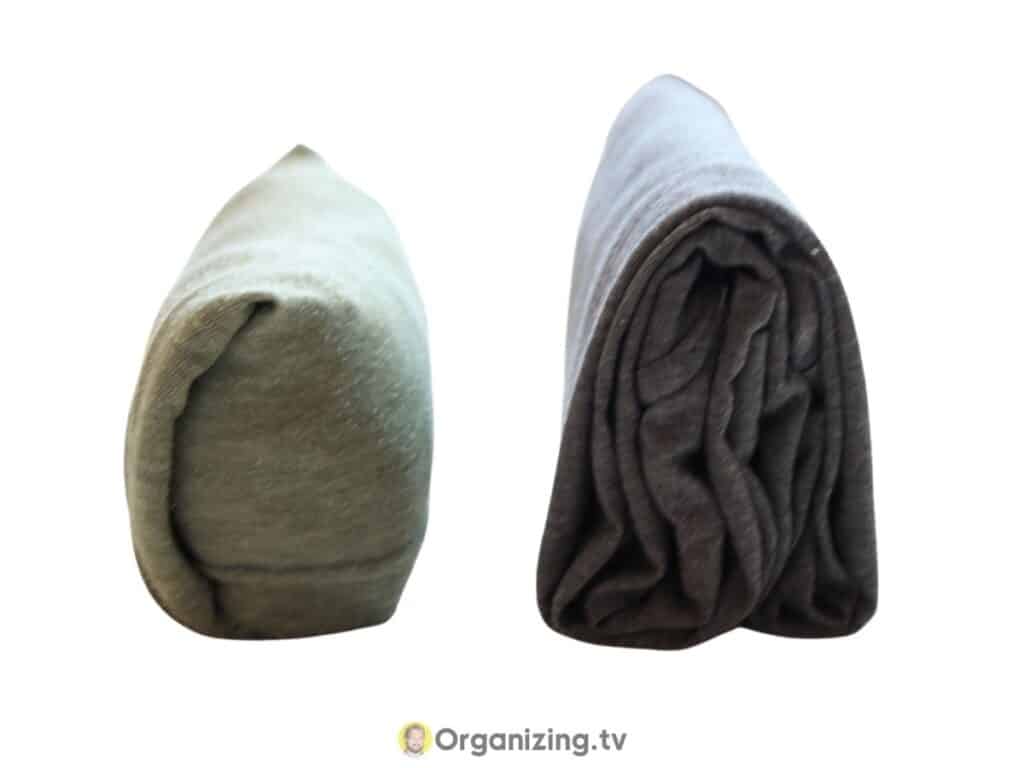
Simple Roll: Fold T-Shirts Without Wrinkles
This simple roll is the only way to fold a t-shirt that really avoids creasing the fabric of your t-shirt. The file-fold is a close second, but as far as storing the t-shirts long-term, this is the best way to go. It is also the folding technique I teach in my premium folding guide for wrinkle-prone clothing.
Here is a free guide on how to fold your clothes to save space that you can check out too.

1. Place the t-shirt on a flat surface with the front facing up
Place the t-shirt with the front facing up. We want to place the t-shirt on an even surface to avoid all creases possible.
2. Even out the visible creases on the t-shirt
Even out the fabric after you laid it down. This is essential as we are going to roll the fabric.
3. Fold the sleeves in so the t-shirt haves an even rectangular shape
Fold in both sleeves, we want to create as much of a rectangular shape as possible without creasing the fabric. Make sure you don’t fold in too much fabric just to get it a more rectangular shape. We can work with a relatively rectangular t-shirt.
4. Fold the t-shirt in one-third over from left side
From the left, fold in the t-shirt a third of the way so it overlaps the collar area of the t-shirt.
5. From the right side, fold the t-shirt over too it completely overlaps the left side fold
Take the right side fabric and fold it over a third as well so it overlaps the entire left side fabric from the previous step.
6. Make sure that the fabric is not creased, and that the edges are evenly lined up
Make sure the fabric looks nice and straight. Even out any clear creases.
7. From the top, gently roll the t-shirt all the way down to the bottom
Gentle is the keyword here. The fabric should not tug at all as you’re rolling towards the bottom of the t-shirt.
I like to use my index-, middle finger, and thumb to do the rolling.
Then assist with the ring finger and thumb, as they are great for evening out the fabric right in from of the roll.
8. Once you reach the bottom, place the rolled t-shirt with the bottom part of the fold facing down
For this roll, when you reach the end, you want to place the end of the roll down to the surface so the roll doesn’t unravel.
9. Stack multiple rolled t-shirt together in a drawer, suitcase, or preferably an organizing system to create structure
You can now stack the rolls vertically, or horizontally in your dresser. For your suitcase and drawers, you need to place them with the longest part down, but it is still a fantastic option for both travel and general storage. I use this Ikea organizing system (Amazon paid link) to stack them horizontally.
Stacking the rolls in a Block Rolling system is even more efficient but requires a bit more training. Check out the course to learn to fold like a pro organizer.
How to Roll Up T-Shirt Sleeves
Find the seam at the end of the sleeve. It should be around the bottom inch of the sleeve. Fold the sleeve up exactly at the seam so it ends up inside out. Repeat as many times as you wish. You can secure the rolled sleeves by attaching a small safety pin to the roll’s inner layers of fabric.
Another option is to sew a few stitches on the inner layers at a few strategic points around the rolled-up t-shirt sleeve. I recommend using a safety pin as it is less permanent. Make sure to be careful not to prick yourself as the safety pin is sharp.
You can view the video for a practical demonstration of all three options.

Can You Hang T-Shirts on Coat Hangers?
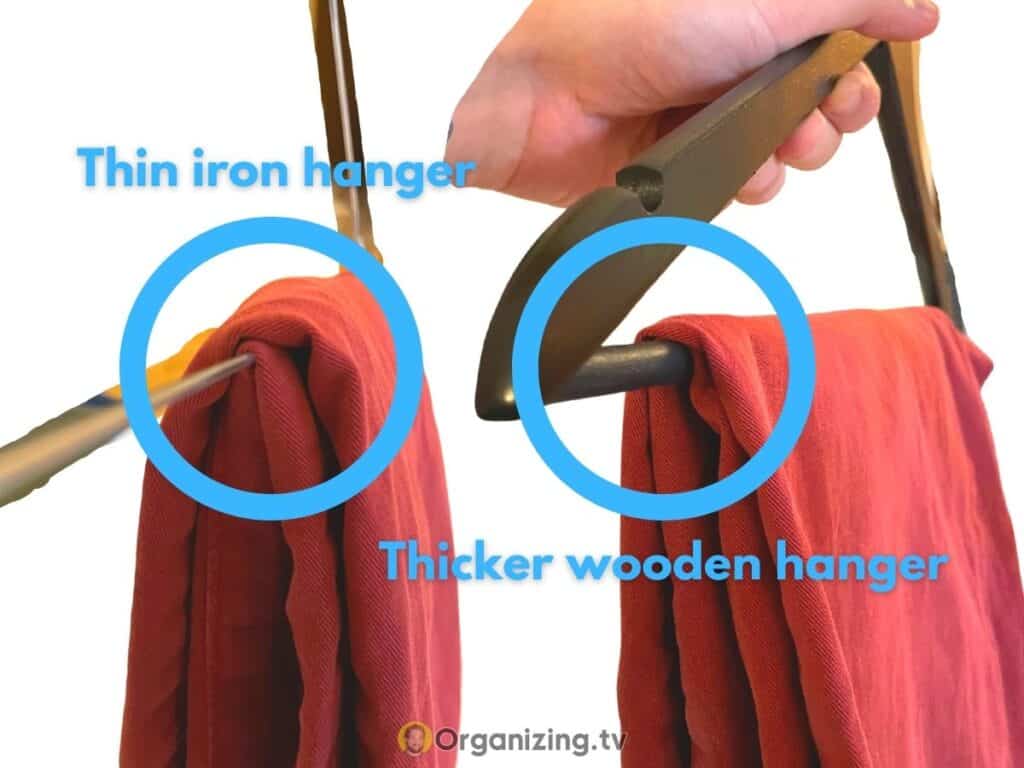
You can hang t-shirts on hangers for a few days, but eventually, they will start to stretch out in the neck and shoulder area. Use hangers with wide shoulders, and avoid thin iron hangers as they will damage the fabric on the shoulders of your t-shirt.
This is because the thin iron hangers don’t have enough surface area to hold up the shoulders of your t-shirts. This is not a problem with thicker plastic- and wooden hangers as they have a wider surface than thin wire hangers.
Here is a good option for a hanger (Amazon paid link) that won’t damage your t-shirts shoulders.

How to Fold Polo Shirts Properly
When folding a polo shirt it is important to keep the structure of the collar intact, as it is very easily damaged, and wrinkled. While the polo shirt is also prone to creases, I still prefer to do a flat fold for polo shirts to preserve the collar. When doing the folds in the step-by-step guide, be gentle so you don create unnecessary creases.
You can learn more about the best ways to store clothes to make them last by tapping the blue link.
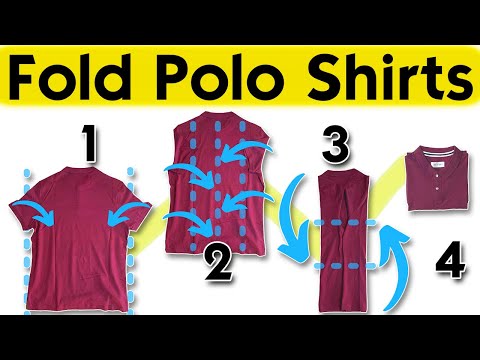
1. Lay the polo shirt on a flat surface with the back facing up
Since we are trying to preserve the collar of the polo shirt, we are starting but placing the polo with the back facing up.
Free free to even out any creases at this point.
2. Fold in the arms to make an even rectangle
Fold both the arms back to create a nice and straight triangle-shaped polo.
3. Fold in one-fourth of the polo from both left and right so they meet in the middle
Split the polo into four parts from side to side. Then fold each side in one-fourth of the way so they meet in the middle.
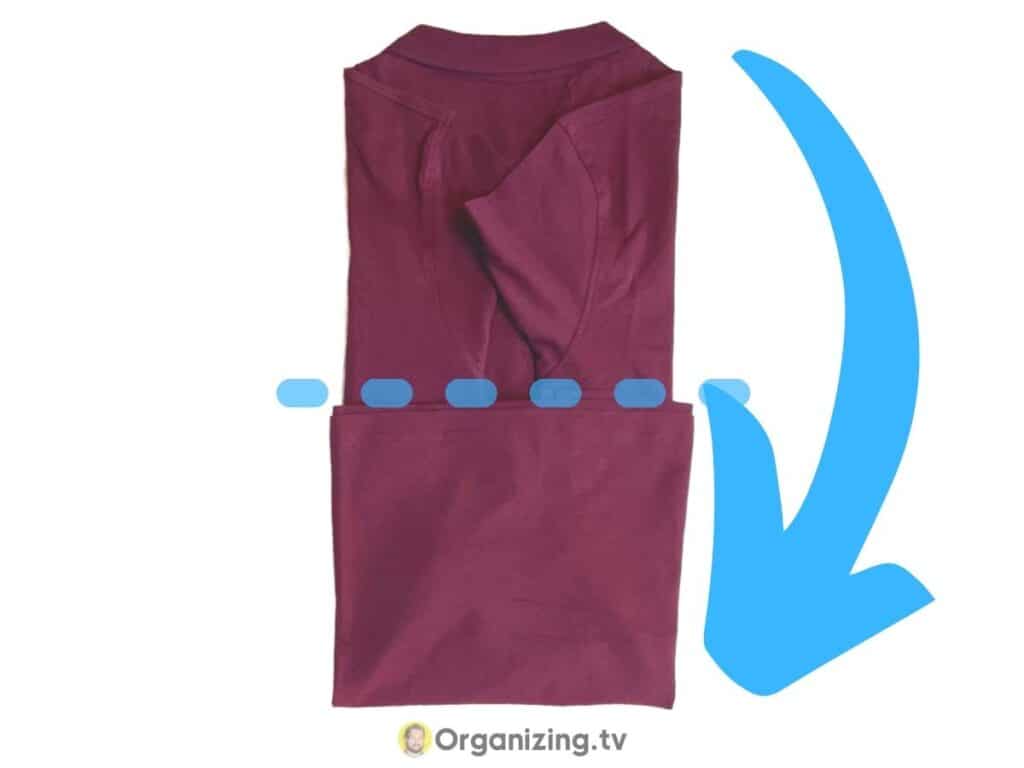
4. Fold up one-third of the polo from the bottom up
From the bottom up, fold a third of the polo shirt upwards so it covers about another third in the middle of the shirt
5. Fold the second -one third of the polo down from the top down so the collar faces up
From the top, fold the collar part of the polo down over the fold from the previous step so it covers the entire fold.
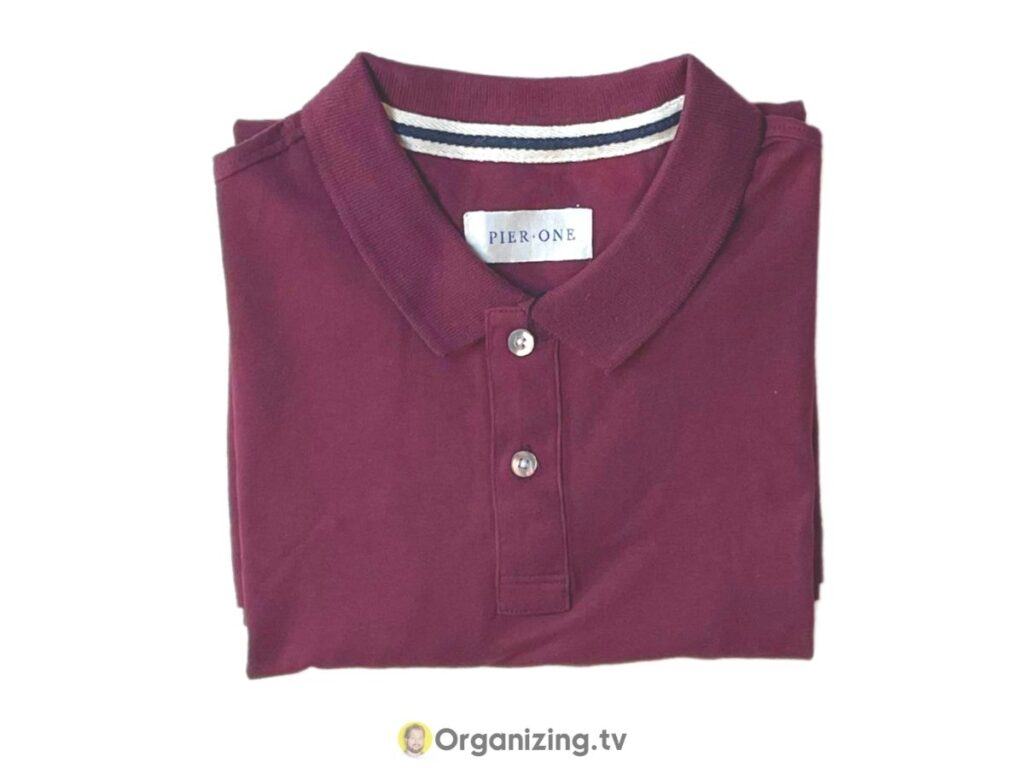
6.Make adjustments to it is even, and place the polo shirt in your drawer
Make adjustments around the edges of the fold. After that, you’re ready to place it in your dresser drawers. Make sure to not put too much pressure on the collar, or it will start to get misshapen.
If you enjoyed this guide, you’re going to love this one about how to fold clothes fast or this one on how to fold clothes small. Feel free to check them out next.
I’m an expert wardrobe organizer and a bit of a clean freak. I created this website and its YouTube channel to share practical guides about laundry and organizing. My teachings have been featured in multiple large news publications, and I’ve self-published two wardrobe organizing books and an entire course on the subject.