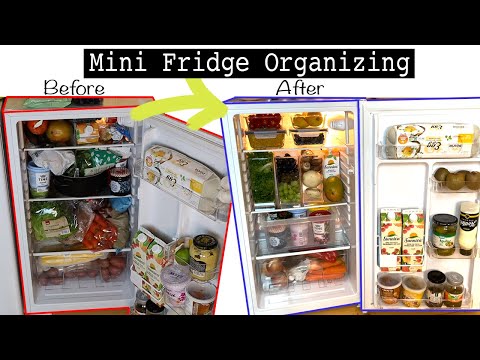
If you have a small fridge, you probably have limited space in your home or apartment. And there’s nothing worse than having a small space that’s also cluttered. If you want a clutter-free fridge, we’ll take you through the most essential steps to organizing it in a way that is guaranteed to utilize the space you have in the most efficient way.
Organizing a small fridge has four simple steps. These include dividing the fridge into sections, preparing your fridge with organizational tools like bins and reusable bags, systematically packing your fridge, and making sure to include your freezer in your fridge makeover.
So, if you want to give your fridge an overhaul that will save space, make clean-up a breeze, and help you keep an inventory of your groceries, our guide is perfect for you. And these steps are so simple that anyone with any budget can follow them!
Divide The Fridge Into Sections
You may be wondering where to start when organizing your fridge. To keep things simple, the first step is the easiest: Sectioning your fridge.
Firstly, think about how you use the food items that you keep stored in your fridge. If you like to keep leftovers, it may be handy to allocate a shelf of your fridge – or half a shelf to save on space – for your leftovers. You can also have a shelf for dairy and eggs or meat and cheese. It is really up to you, and you should base it on what you use.
Secondly, there are a few essential things to keep in mind when organizing your smaller fridge. One, space is limited. So don’t buy what you don’t need or use! I know it’s easier said than done, but you know what kind of food gets left uneaten in your fridge. So do yourself a favor and stop buying those products altogether!
The fridge’s top shelf is the first shelf below the freezer, which means that it is the coldest. So the top shelf of your fridge is great for keeping things extra cold, like dairy and eggs.
And three, the door of your fridge is a major life and space-saver! Keeping your door for products like drinks and condiments can help you save a ton of space in the body of your fridge. Besides, if you’re anything like me, you hate nothing more than having to rummage around or take things out of your fridge to find the ketchup!
So, once you have an idea of what kind of foods you want to keep, it’s time to put your sections into action. Now it’s time to prep your fridge.
Prepping The Fridge
So, what exactly does prepping your fridge imply? Well, there are plenty of tips and tricks that come in handy when organizing something – and keeping it organized.
Using organizational tools and helpers like fridge mats, bins, containers, bags, labels, and even lazy susans can create a clean, well-kept fridge. And you don’t need to spend a lot of money to get your hands on these helpers, either!
You can find most small bins and lazy susans at dollar stores. So, you can grab most of the tools you need for just a few bucks.
We have given you a few ways to use these tools and ensure that you’re getting the best bang for your buck when it comes to space.
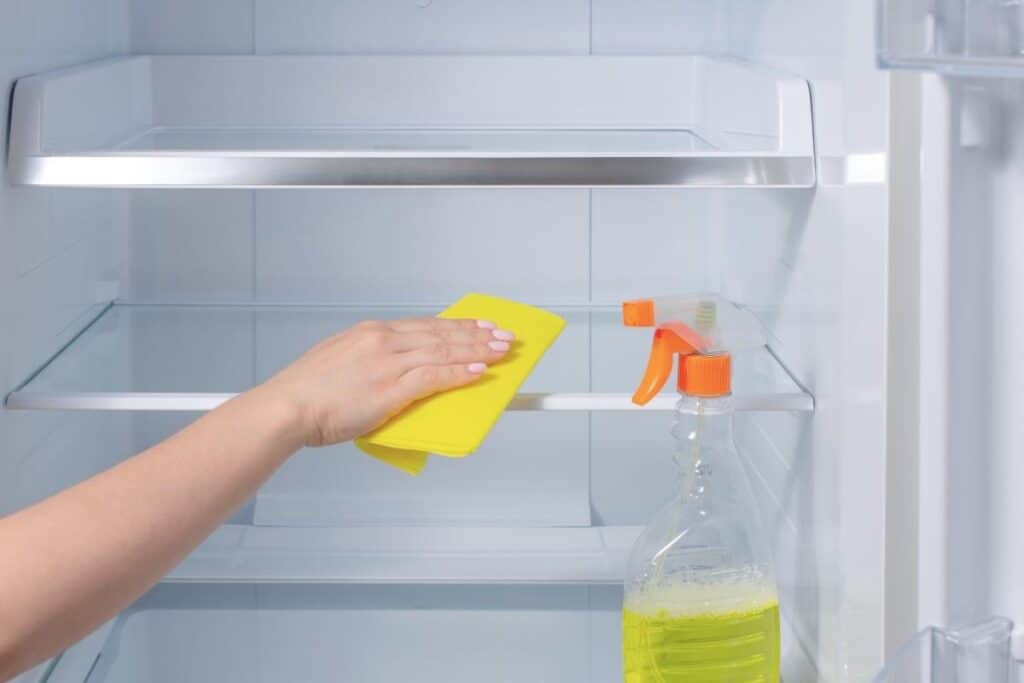
1. Fridge Mats
Okay, so you’re probably thinking to yourself, “What is a fridge mat?” and “How does it help me?”.
A fridge mat is really just a mat that you place down on the shelves of your fridge. And it can help you by keeping your shelves clean and tidy. Instead of taking your fridge apart to clean the shelves, having a fridge mat can help you make cleaning easy. And the easier your fridge is to clean, the longer it will stay organized.
2. Bins
Bins are a handy way to keep your fridge tidy. But be careful – you don’t want too many! Having too many bins can make it challenging to find items you’re looking for, and it can sometimes be less efficient than packing everything out separately.
Depending on your fridge, drawers are usually built in to your fridge to keep your fruit, veggies, and meat. But, in a smaller fridge, those drawers can be really, really small. So if you have fruit or veggies that can’t fit into the drawer, pop them into a bin or two and slide them into their allocated spot in the fridge. Voila!
You can do the same thing with anything you fancy, like cheese. If you have a few different types of cheese in your fridge, grouping them in a bin can really help free up some extra space.
3. Containers
Using containers may seem like a no-brainer, but just in case you haven’t thought of it, containers are your friend!
Using containers for groceries like eggs can be super handy. For example, if you buy two smaller egg containers that hold six eggs each, you can easily stack them on top of one another instead of having one long egg holder that takes up too much room.
This goes for things like juice and milk as well. Finding smaller jugs that fit into your fridge can be helpful to free up space in the door of your fridge. So, go ahead and decant that orange juice and put it in the body of your fridge – you won’t regret it!
Containers for leftovers are also a good idea. By using containers that can easily stack on top of one another or can fit perfectly side-by-side, you can give yourself more room inside your fridge to work with.
4. Bags
Take your groceries out of their original containers and put them into sealable, reusable bags whenever and wherever you can. You may not realize it, but containers can take up a lot of unnecessary space. And when you have a container with an odd shape, this problem can be even worse.
The bags work on the same principle as the containers. If you can make your items more compact, you should!
It may seem like a bit of a chore at first to repack your groceries into different containers and bags. But, once you get used to it, it becomes a natural part of your routine when unpacking your groceries.
5. Labeling
This step is entirely optional, but I have found that it can make a world of difference in organizing your fridge. Using an erasable marker or a label-maker, you can label all your bags, bins, and containers.
Although it may seem simple, it can help to keep your fridge organized and help you find things when you’re first starting out. You don’t want to have to pull three different bins out just to find your tomatoes!
It’s not just an organizational hack, either. It can help you keep an inventory of what’s in your fridge, when it goes bad (if you label it with an expiry date), and what you need to add to your grocery list.
If you have more than one of a specific item, it can also be handy to label the bag that it’s in with something like “Eat me first” or with a number. For example, the bag labeled number 1 is the product we need to use up first.
6. Lazy Susans
That’s right! Lazy susans aren’t just for the dinner table anymore. Buying a cheap plastic lazy susan from the dollar store can save you a lot of space and help you to see items easily. By placing different items around the base, you can turn it around when looking for a specific item or product.
These are great if you don’t have enough door space for all of your condiments, or you have a few jars of leftover food that isn’t enough to keep in a full-sized container.
Packing The Fridge
Now to the fun part! Packing your fridge may seem a little daunting, but if you’ve gathered some organizational helpers like bins and containers, you should be ready to go!
Now that your fridge door is free of bulky juice and milk containers, you can use it to keep your condiments neatly organized and on display for better accessibility. You can also use any free door space for soda tins.
Again, remember to pack your built-in drawers first. Then use your bins for any leftovers that can’t fit and slide them into your fridge. An excellent place to put them is right above the veggie drawer so that we are still keeping our items categorized.
Now, starting from the top shelf, pack your items and bins as you want them. It all depends on how you’re going to use your fridge. You can generally keep leftovers on the middle or second last shelf with the fruit/veggie bin because they’re not considered a food prep item.
Keeping the items that you cook with or prep your food in an easy-to-reach place will help you keep your fridge and yourself organized. You don’t want to be bending to the bottom of the refrigerator every time you want some cheese!
Your bottom shelf can be used for any raw meat or seafood products. These products are prone to dripping and unwanted spills. So, if you want to avoid the rest of your food smelling like prawns, keeping these items on the bottom shelf can help you to avoid unnecessary mess.
If you have any glass bottles or cans that can’t be packed into the door of the fridge, you can use the pyramid method. To do this, you need to pack three or four bottles on their side (with the cap facing you) and stack other bottles on top of them.
To make the pyramid, you’ll need to pack the next ‘layer’ or bottles on top of the first row, in between the gaps. If your bottles are slipping and sliding on the bottom, you can use a binder clip on one of the racks of the shelf as a makeshift stopper. No more shifting!
When you’re packing your fridge, you’ll also want to avoid clutter. Having your fridge packed too tightly can cause your food to spoil more quickly. Air needs to move around your food to keep it cool and fresh, but when there isn’t enough space for the air to circulate, your groceries can spoil more quickly.
Now that your fridge is packed and immaculately organized, you can enjoy your newly decluttered space. But, before you get too comfortable, you’ll need to repeat all of these steps in your freezer.
I know it seems like a lot, but it is so worth it in the end for a clutter-free fridge.
Don’t Forget The Freezer
When you’re organizing your fridge, it can be easy to forget that these space-saving methods are just as effective in your freezer.
If you are opening frozen food bags, it can be a good idea to decant whatever is left into reusable bags. Then, you can pop all of the bags into a bin. Now, your freezer has much more space to work with, and you can start the organizing process all over again.
Unlike your fridge, the freezer doesn’t need to be kept categorized. Having one bin on the bottom shelf of your freezer makes it easy enough to pull the bin out and grab what you need, then put it back.
Because freezers attached to small fridges are so small, it can be a little harder to try and divide your freezer into sections.

Conclusion
So, there you have it! The best tricks and tips for organizing your small fridge. You don’t need to be a neat freak or organization junkie to keep your fridge in order.
If you’re ever in doubt, remember the four simple steps to have a clutter-free, optimized fridge:
- Divide the fridge into sections
- Prep the fridge
- Pack your fridge
- Do it all over again with the freezer!
Next, check out the guide on how to stack your kitchen appliances properly, or the guide on which is the better fridge LG or Ge.
I’m an expert wardrobe organizer and a bit of a clean freak. I created this website and its YouTube channel to share practical guides about laundry and organizing. My teachings have been featured in multiple large news publications, and I’ve self-published two wardrobe organizing books and an entire course on the subject.